
CH 06 · Run from the Command Line: headless + CLI
Chapter Goal
The previous chapters all clicked around in the Web UI. This chapter changes the form: no interface at all, a single command in the terminal lets dsh finish a job and exit — that's headless. While we're at it, we'll go through all the doors the dsh "launcher" can open; it'll come in handy later for scripts, CI, and batch jobs.
First Understand: dsh Is a Multi-Entry Launcher
dsh is not just "that web page". It's a launcher — the same Harness, the same plugin stack, can start in different forms:
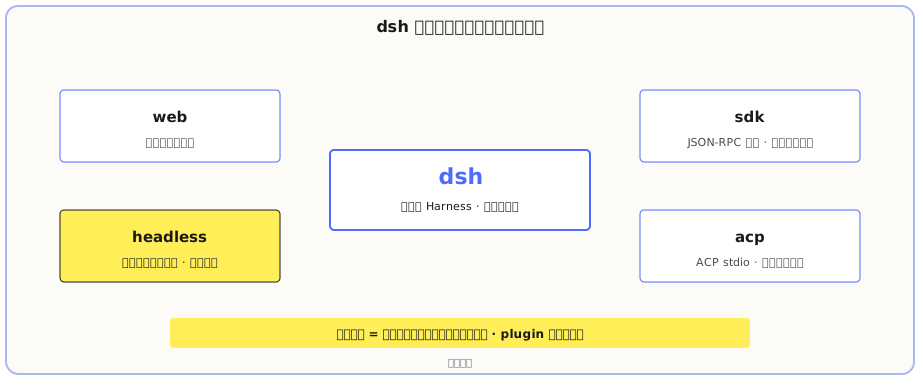
The official entry points are these doors:
| Entry | Purpose | In plain words |
|---|---|---|
web | The web workbench with interface | The one you used in the previous chapters |
headless | Run one task, print the answer, exit | Command-line one-shot task, the star of this chapter |
sdk | JSON-RPC stdio service | Acts as a backend for programs, lets other applications call it |
acp | ACP stdio service | Provides service to automation clients |
plugin | Plugin management for profile | Install plugins, add dependencies to a profile — that's what this is for |
No matter which door you enter through, the same plugin stack is doing the work underneath. CH 02 said "everything is a plugin"; by now you should feel it: even the "entry" itself is a combination of plugins.
headless: One Sentence, One Task
headless is the one-shot task in command-line mode. The usage is dead simple:
dsh --profile headless "what you want it to do"Its behavior, in one official sentence: open a brand-new persistent session → do the work → print the final answer → exit.
A few key points:
- Workspace = the directory you're in when you run the command. Wherever you run the command, that's where it works (no need to manually pick a workspace like in the Web UI).
- "Open a brand-new persistent session" is literal: every headless run is equivalent to opening a new session in the current directory as the workspace, and saving it to
$DSH_HOME/sessions. This is easy to confuse, so let me untangle it for you — on the file level: sessions are stored per workspace folder, underC:\Users\<your-username>\.dsh\sessions\, where you can directly see directories named after workspace paths (like--E-software-workspace-...--), containing compressed session files; at the Web UI level: the session from a headless run shows up in the Ungrouped category, not automatically under any workspace group (in the current version). File storage is by workspace, UI display is in Ungrouped — those are two separate things. The hands-on section below will show this. - The default model is
deepseek-v4-flash: the CLI scenario has no UI and no need for images, so the official default gives the most cost-effective flash. - No UI, but the full pipeline is there: context injection, planning, tool calls, thinking, wrap-up — nothing's missing, it just doesn't draw it for you.
Hands-on: First headless Task
Give the Agent a "big task": read the repo, summarize the architecture, and write a Chinese document. Run it in the workspace:
dsh --profile headless "Read the deepseek-harness subdirectory's code and docs, summarize the overall architecture of DeepSeek Harness (plugin mechanism, layering, entry points, main packages and directories), and write a Chinese markdown architecture document saved to the current directory with the filename deepseek-harness-arch.md"Result printed after running:
Done. I read the key source and docs in the deepseek-harness subdirectory, organized it into a Chinese architecture document and saved it to the current directory.
File: E:\software-workspace\DeepSeek harness demo\deepseek-harness-arch.md (about 295 lines)
Go back to the Web UI to verify this session: you can find it in the session list, but note it appears in the Ungrouped category, not under a workspace group (headless sessions aren't auto-grouped, this is the current version's actual behavior):
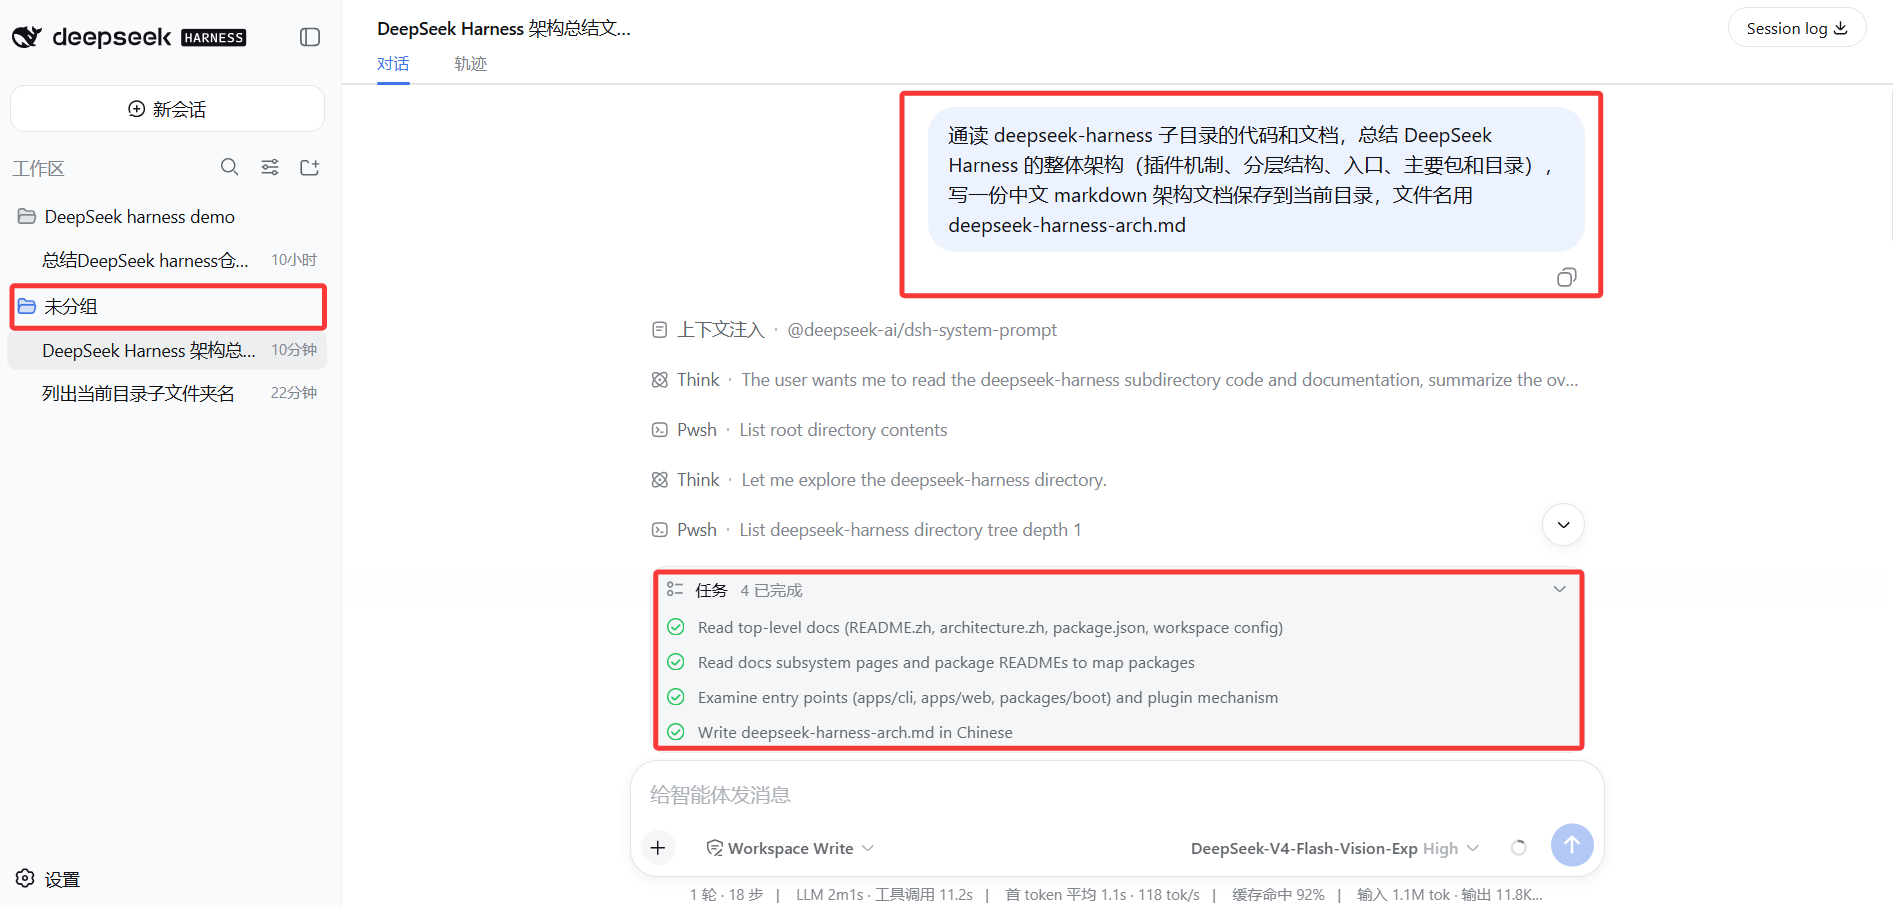
On the right you can see its full execution process: context injection → think → Pwsh list directory → read doc → write file. The bottom stats bar shows 1 turn · 18 steps, LLM 2m1s, cache hit 92%, input 1.1M tokens.
CLI Parameter Cheatsheet
| Command | Effect |
|---|---|
dsh --profile <name> "task" | Start with the specified profile (headless is one of them) |
dsh web | Alias for --profile web, launches the Web UI |
dsh --dump-config | Print the combined full configuration tree (troubleshooting gem, see below) |
dsh --dump-default-config | Print the default configuration tree without user changes |
dsh --patch <path> | Stack another layer of configuration on top of the profile |
dsh plugin --profile <name> add <package> | Install a plugin into a profile |
dsh --help | See the launcher's own help |
--dump-config deserves a separate mention: it prints the final effective plugin combination for a profile. Run it for real:
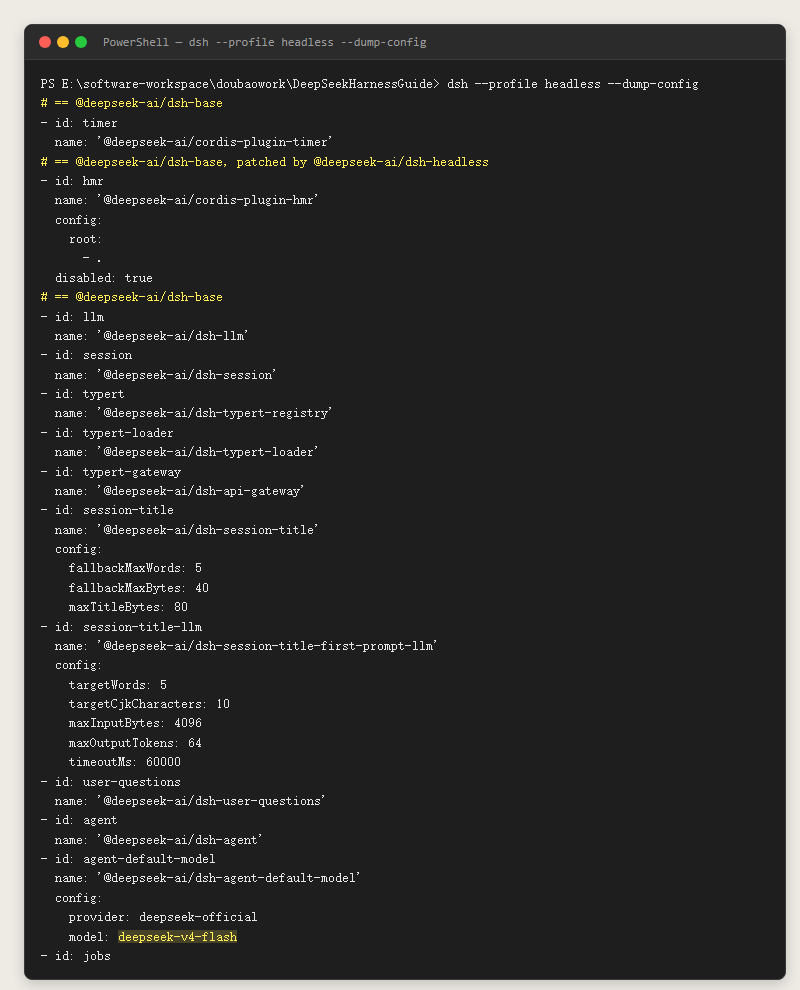
What you see is a long list of @deepseek-ai/dsh-* plugins stacked into a tree — llm (model), session (session), credentials (keys), session-persistence-jsonl (session persistence)... you can also directly see that agent-default-model is configured to deepseek-v4-flash. When troubleshooting or trying to figure out "where does this behavior come from", dump the config tree first.
There's an even more convenient trick for troubleshooting: just let the AI run this command itself. For example, in a session ask it "use dsh --profile headless --dump-config to check the current config tree and see why the default model isn't what I want" or "check whether a plugin isn't taking effect" — the AI will execute --dump-config itself, read the config tree, and work through the config one entry at a time to help you locate the issue. This combo is a very practical punch when troubleshooting.
When to Use headless, When to Use web
| Scenario | Which to use |
|---|---|
| Want to watch the Agent work, interrupt anytime, troubleshoot step by step | web |
| Scripts, CI, scheduled tasks, batch processing, only the result matters | headless |
| Other programs/tools need to call dsh's capabilities | sdk / acp |
| Want to confirm config, troubleshoot startup issues | --dump-config / --help |
Also remember an official boundary: each headless call only runs one task, with no interactive follow-up. If you need multiple turns or to watch it work, go back to web.
What you learned in this chapter
You pass if you can complete the items below:
- [ ] Describe at least four dsh entry points (web / headless / sdk / acp / plugin) and what each does
- [ ] Run a command-line one-shot task with
dsh --profile headless "task"and explain its behavior (new session → work → print answer → exit) - [ ] Know the headless workspace is the current directory when running the command, and that each run opens a persistent session (stored per workspace under $DSH_HOME/sessions; in the Web UI session list, headless sessions are in Ungrouped)
- [ ] State the scenarios headless is suited for (batch, CI, scheduled, repo analysis) and the official boundary (one task per call, no interaction)
- [ ] Use
dsh --dump-configto view the config tree, and know its troubleshooting use - [ ] Judge whether a scenario should use web or headless