
CH 23 · UI Plugins: Reskin, Add Panels, Inject Content into dsh
Chapter Goal
The plugins in the previous chapters worked in places "you can't see": register tools, intercept calls, provide dependencies. This chapter switches to the visible layer — plugins can directly change the Web UI's look and capabilities. This chapter makes clear what UI plugins can do, how they work, and hands-on to see a real event stream.
You're Already Using UI Plugins
Looking back at CH 18, we installed three plugins, and they were all UI plugins:
| Plugin | What it does |
|---|---|
| dsh-theme | Skin the Web UI (a theme card appears in Settings → Appearance) |
| dsh-oil-sticky-prompt | Pin the latest user message to the top while scrolling |
| dsh-better-sidebar | Sidebar workbench, see the directory directly from the file panel |
You might have just "installed a plugin" at the time, but now you understand: they all modify the UI. That's the first level of understanding of UI plugins — they are responsible for all the customization you "can see".
What UI Plugins Can Do
Roughly three categories of capabilities:
- Reskinning: change colors, fonts, layout style. The lightest category, dsh-theme is one.
- Modify layout / add panels / add features: move the sidebar, top bar, input area, and also directly add a complete feature module or visualization panel to the interface. dsh-better-sidebar, dsh-oil-sticky-prompt are in this category; the DSH Skill & MCP Panel you installed in CH 13 is also one — it directly adds an "MCP Management" entry to Settings, each server's status and tool count visible at a glance, equivalent to adding a visualization O&M panel to the Web UI.
- Contribute content to the conversation: render custom rows in the session (e.g. draw a card for a certain kind of tool result, insert special nodes). This is the deepest category, officially called "contribute business rows to the Web Client".
The first two categories are mostly pure front-end work; the third really needs to "hook into" the conversation rendering pipeline.
How UI Plugins Work: It All Starts with the Event Stream
UI plugins don't directly manipulate the DOM on the page, they subscribe to the event stream. This is the most critical point in understanding UI plugins.
Throughout a session, every event becomes a standard event: user sent a message, model started streaming output, a step started, a tool call happened... these events flow through the session/event channel like water. The built-in interface renders conversation bubbles, trajectory, and status from them; UI plugins do the same, subscribing to the same stream via ctx.on('session/event', ...).
The official minimum example for a UI plugin does exactly this:
export const name = 'my-ui'
export const inject = ['agents']

export function apply(ctx) {
  ctx.on('session/event', (_session, event) => {
    if (event.type === 'assistant/chunk' && event.data.chunk.type === 'text-delta') {
      console.log(event.data.chunk.text)   // Each piece of the model's streaming output
    }
  })
}
The skeleton of the whole mechanism:
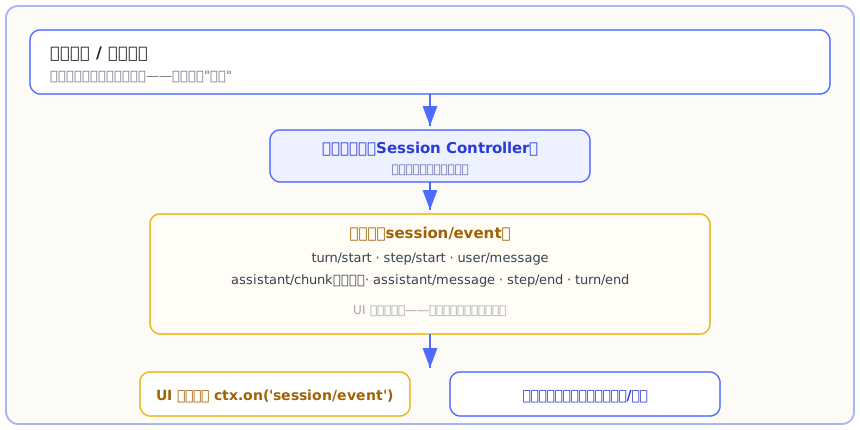
You input, the model replies, the session controller translates them all into an event stream; UI plugins and the built-in interface subscribe to the same stream, each takes what they need. The interface is a "consumer" of the event stream, not a direct manipulator of the DOM — this also explains why "everything is a plugin" can cover the UI: even the interface is "listened out" by plugins from the event stream.
Hands-on: Install an "Event Observer" to See the Event Stream
Just looking at the mechanism isn't enough fun, let's write a minimalist plugin that prints every session event — see how much really happens behind a single conversation.
Step 1: Create Directory, Write Plugin
In a workspace where you want to put plugins:
New-Item -ItemType Directory -Path "ui-demo\src" -ForceCreate ui-demo\src\event-watch.js:
export const name = 'event-watch'

export function apply(ctx) {
  ctx.on('session/event', (_session, event) => {
    console.log(`[event] ${event.type}${event.data?.type ? ' / ' + event.data.type : ''}`)
  })
}
Just subscribe to session/event and print out the type of each event.
Step 2: Declare the Plugin
Create ui-demo\cordis.yml (replace the path with your own, remember %20 for spaces):
- insert:
    - id: event-watch
      name: 'file:///E:/your-workspace/ui-demo/src/event-watch.js'
Step 3: Run headless Once
cd your-workspace-directory
dsh --profile headless --patch "./ui-demo/cordis.yml" "Just reply: hi"
My actual terminal output:
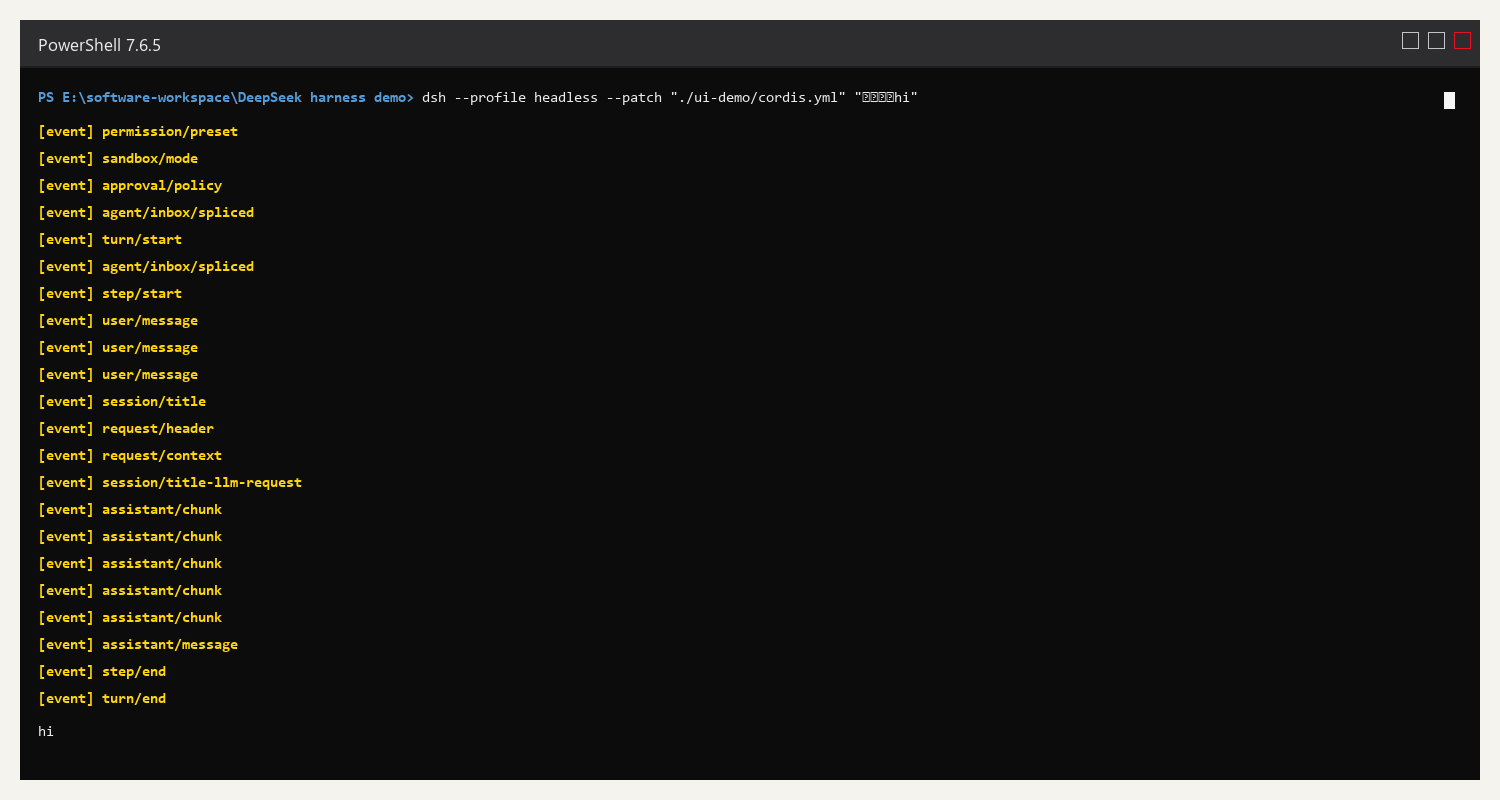
Just answering "hi", behind the scenes went through 22 events: session initialization (permission, sandbox, approval), turn/start, step/start, three user/messages, request headers, assistant/chunk streaming out text one by one, assistant/message settling, step/end, turn/end...
The conversation you see in the Web UI is this string of events being rendered after consumption. The event observer let us "see" the raw material behind the UI for the first time.
Let dsh Do It: Develop a Visible UI Plugin
The event observer above just "watches events" and hasn't really changed the interface. Have dsh directly develop a UI plugin where the effect is visible in the settings page, it can do that.
Send this prompt directly in the Web UI's input box:
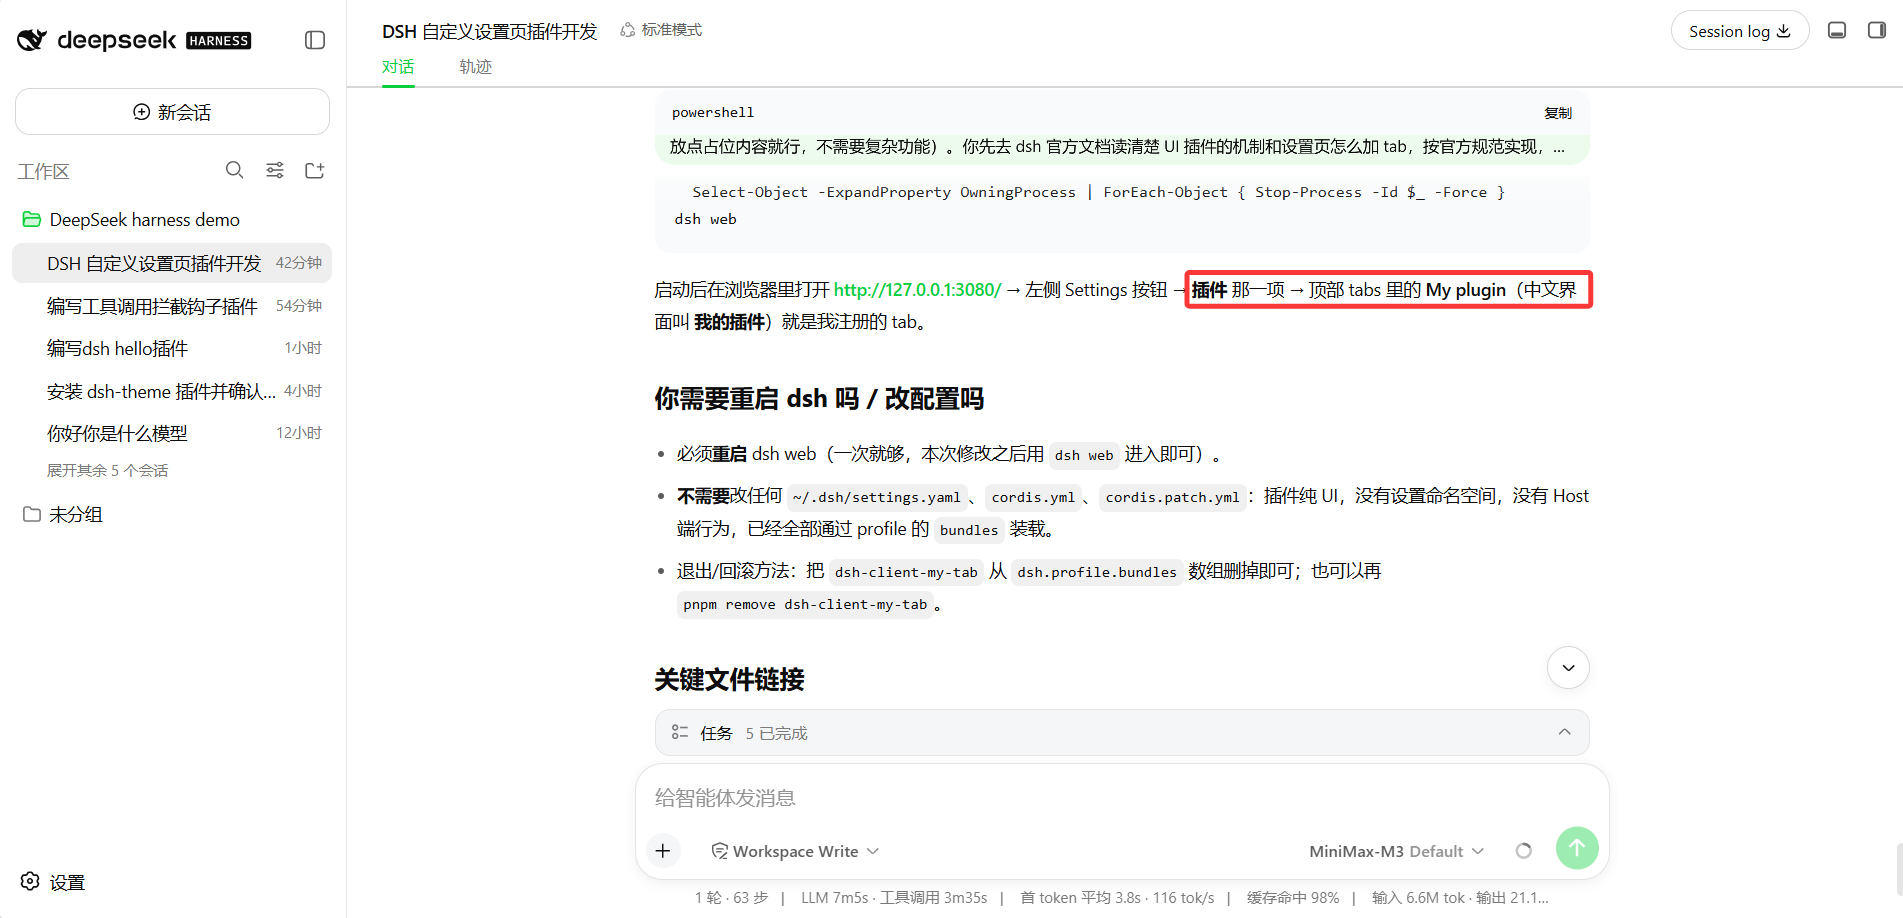
In my current workspace, help me develop a simple UI plugin visible in the Web UI: add a custom tab to the settings page (e.g. called "My Plugins", with some placeholder content on the page, no complex functionality needed). First read the dsh official docs to understand the UI plugin mechanism and how to add tabs to the settings page, implement per the official spec, tell me which profile to install to, how to see it in the interface (and tell me if you need to restart dsh or change config).It will go read the docs itself, judge the tech stack (such interface plugins usually need TypeScript and front-end build, it'll handle that itself), implement, and tell you how to verify. Follow its instructions to restart dsh, and you'll see the new tab in the settings page.
This is me actually running it once — it went from reading the docs, writing the plugin, installing into the profile, to telling me how to see it in the interface, how to exit, all done by itself, even highlighting the key paths:
After restarting, go to Settings → Plugins, and the top has a new "My Plugins" tab:
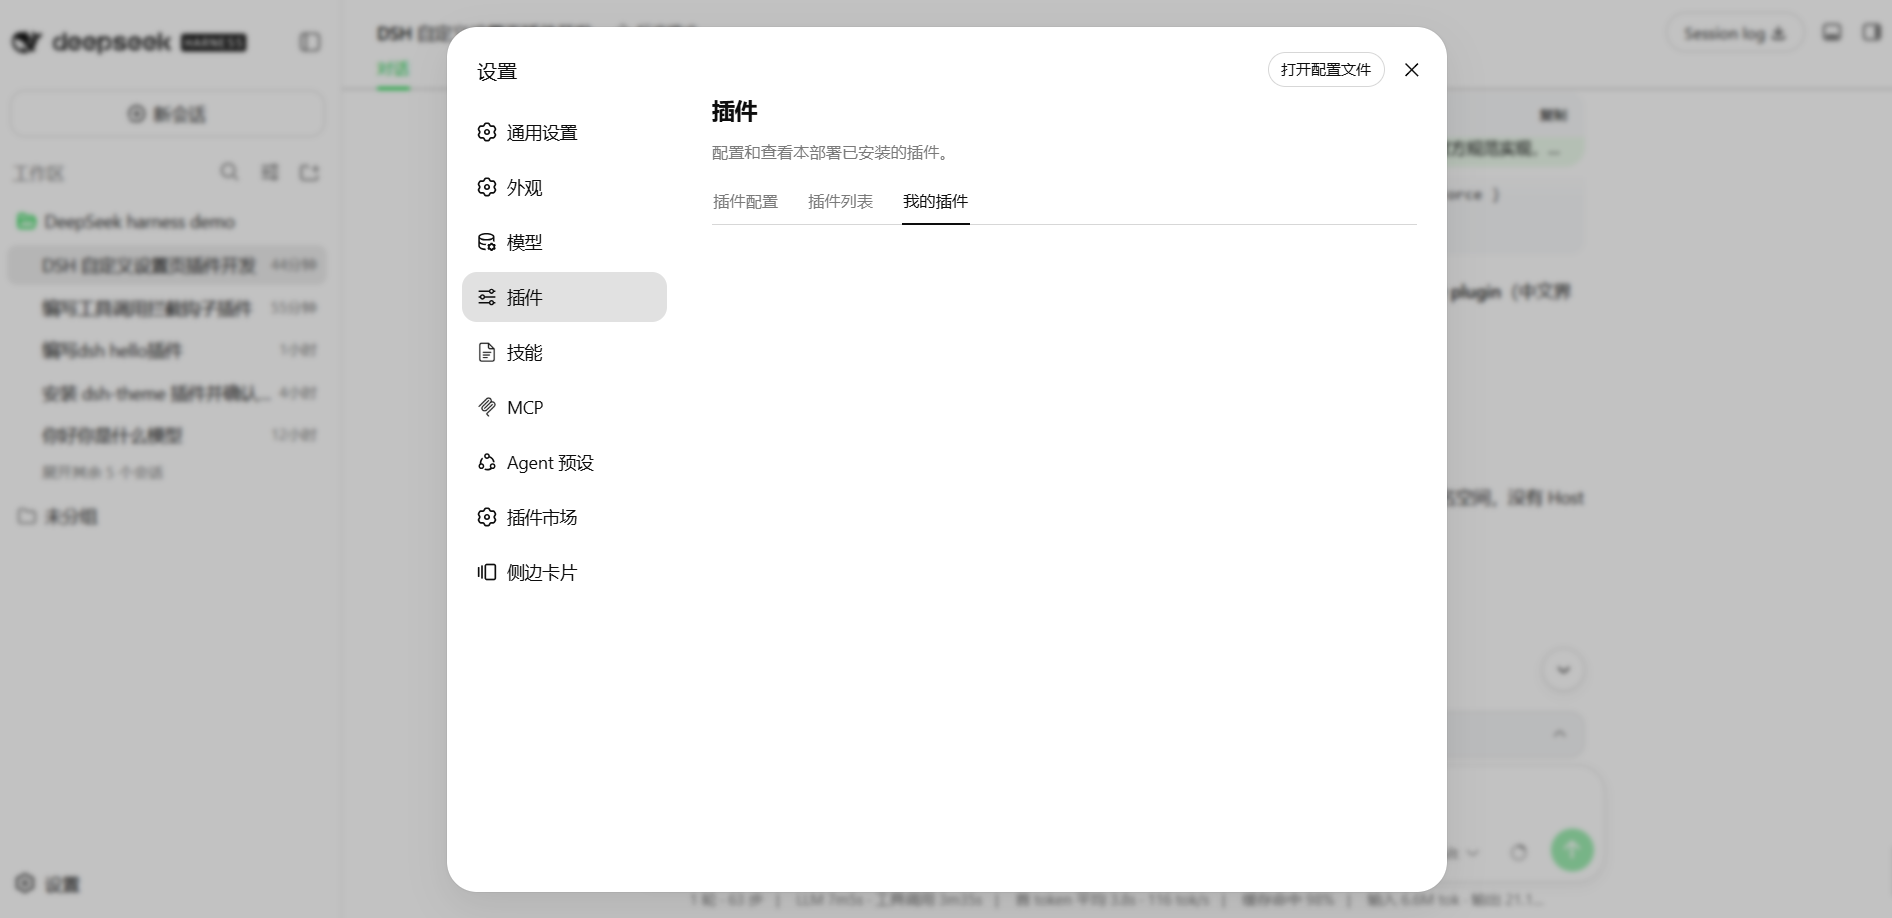
A detail: this plugin is pure UI, no Host-side behavior, so no changes to settings.yaml / cordis.yml — everything is loaded through the profile's bundles. Rolling back is also simple: just remove it from the bundles array. This is another embodiment of "everything is a plugin": even adding a tab on the interface is "install a plugin".
Common Pitfalls
| Problem | What's happening | How to handle |
|---|---|---|
| Event observer doesn't print | session/event subscribed wrong, or plugin not loaded | Confirm cordis.yml path, ctx.on syntax |
| So many events you can't read them | One conversation naturally has dozens of events | First look between turn/start and turn/end, that's the main trunk |
| Want to draw content directly in the conversation | That requires a React renderer, advanced | First get comfortable with the event stream and settings, advanced later |
Reports Cannot find package | Plugin uses external dependencies that aren't installed | npm install the corresponding package in the plugin directory |
What you learned in this chapter
- [ ] State the three categories of UI plugin capabilities: reskin / layout & panel / session content contribution
- [ ] Understand the core mechanism that "the interface is a consumer of the event stream"
- [ ] Use
ctx.on('session/event', ...)to subscribe to session events - [ ] Use the event observer to see the event stream behind a single conversation
- [ ] Know that UI plugins can add custom tabs to the settings page