
CH 17 · Plugin Installation
Chapter Goal
In CH 12 you actually already installed three plugins — dsh-mcp-client, dshmarket, dsh-skill-mcp-panel — but that was "install on the way, as long as it works", the three installation methods weren't explained. This chapter systematically covers installing plugins: where plugins come from, where they get installed, the different installation methods, how to manage them, how to verify after installation — and finally hands-on install one, and have dsh install it for you directly.
First remember one line: installing a plugin = adding an npm dependency to a profile. dsh is "everything is a plugin" (covered in CH 08), but the "installation" itself follows standard package management. Once you understand install, CH 18 starts writing your first plugin.
First See Your Install
Open the terminal, first check dsh itself's version:
dsh --versionMy output:
0.1.1-rc.2Then check which plugins the web profile already has:
dsh plugin --profile web listMy output (the result of installing in CH 12):
Legend: production dependency, optional only, dev only

dsh-profile-web C:\Users\mortal\.dsh\profiles\web (PRIVATE)
│
│   dependencies:
├── @deepseek-ai/dsh-mcp-client@0.0.1-rc.1
├── dsh-skill-mcp-panel@2.0.1
└── dshmarket@1.40.0

3 packages
Note that these three lines correspond exactly to the three installation methods: mcp-client was installed via the command line, dshmarket is the command-line installed market body, and dsh-skill-mcp-panel was one-click installed in the market — and the reason they can directly enter the config tree and take effect is the third mechanism bundle auto-mounting. Each is explained below.
Where Plugins Come From: Four Sources
A plugin is essentially an npm package, and the sources are these:
| Source | Syntax | When to use |
|---|---|---|
| npm package | @deepseek-ai/dsh-mcp-client | Most common. Official packages have the @deepseek-ai/ prefix, community packages use their own scope |
| GitHub source | github:owner/repo | When you want to install a repo's main branch, and it hasn't been published to npm |
| Local directory | . or file:../plugin | When you develop a plugin yourself, install your local checkout directly, edit and test |
| tarball / Release artifact | A .tgz URL or local path | When the author only ships built artifacts, e.g. attachments in GitHub Releases |
As for the dsh-market (Plugin Market) installed in CH 12, it is not a new source, but a graphical entry: once installed, you can browse, search, and one-click install community plugins in Settings, with it still calling the above sources behind the scenes.
Where to Install: Profile Level, Follows the Profile
dsh plugin manages the plugins of a profile, so the command must come with --profile <name>, deciding which environment to install into. The installed package lands at:
$DSH_HOME/profiles/<name>/node_modulesOn Windows this is C:\Users\<your-username>\.dsh\profiles\web\node_modules, managed by pnpm, and also written into the profile's package.json.
A point easy to mix up — the difference between global and Profile:
- The dsh body itself is installed globally (
npm install -g @deepseek-ai/dshfrom earlier), all profiles share the same dsh. - Plugins are per-profile by default:
dsh plugin --profile web add xxxonly takes effect for web; if you want headless to use it too, you have to install it for headless too. - Machine-level config is a different layer:
$DSH_HOME/cordis.patch.ymlis shared by all profiles (the official term is "machine-local preferences"), and it has higher priority than the profile's owncordis.patch.yml— if you want all environments to apply the same change, write it here.
First make clear where these files are, don't mix them up. The profile-level one is at C:\Users\<your-username>\.dsh\profiles\web\cordis.patch.yml (the one we edited for MCP server config in CH 12); the machine-level one is at C:\Users\<your-username>\.dsh\cordis.patch.yml — note that this file does not exist by default, it is only created when you manually write the config, dsh reads it at startup, and skips it if it doesn't exist. So to verify "is what I wrote machine-level", check whether it appears under the .dsh root directory, not under profiles\<name>\.
- The official built-in bundles (
@deepseek-ai/dsh-base,@deepseek-ai/dsh-web-appetc.) ship with dsh, from the global install; the plugins you add yourself are installed in the profile's ownnode_modules.
One line to remember: dsh body is global, plugins follow the profile, machine-level patches apply site-wide.
Three Installation Methods
① Command line dsh plugin: The Most Fundamental
This is the most fundamental method. dsh plugin --profile <name> will pass the arguments as-is to pnpm — so pnpm verbs like add, remove, update, why, list are all available, and the syntax is also npm package management syntax:
dsh plugin --profile web add @deepseek-ai/dsh-mcp-clientA typical example from the official docs is installing two subagent plugins (they're optional bundles):
dsh plugin --profile web add @deepseek-ai/dsh-subagent-codex @deepseek-ai/dsh-subagent-claude-code
dsh plugin --profile web remove @deepseek-ai/dsh-subagent-codex
Installing your own plugin from a local directory also goes through here — run dsh plugin --profile web add . in the plugin's source directory, and what gets installed is your current checkout (relative paths anchor to the directory you ran the command in, not the profile directory).
② Plugin Market dsh-market: The Easiest
Graphical installation. First install the market body itself:
dsh plugin --profile web add dshmarketAfter installation, restart dsh (bundle changes require a restart, explained below), Settings will have a new "Plugin Market", where you can browse by category, search, and one-click install community plugins. Most plugins installed via the market take effect just by refreshing the page, no need to restart dsh; some host-level plugins will prompt "restart required", just follow the instructions. The dsh-skill-mcp-panel in CH 12 was searched out in the market and one-click installed.
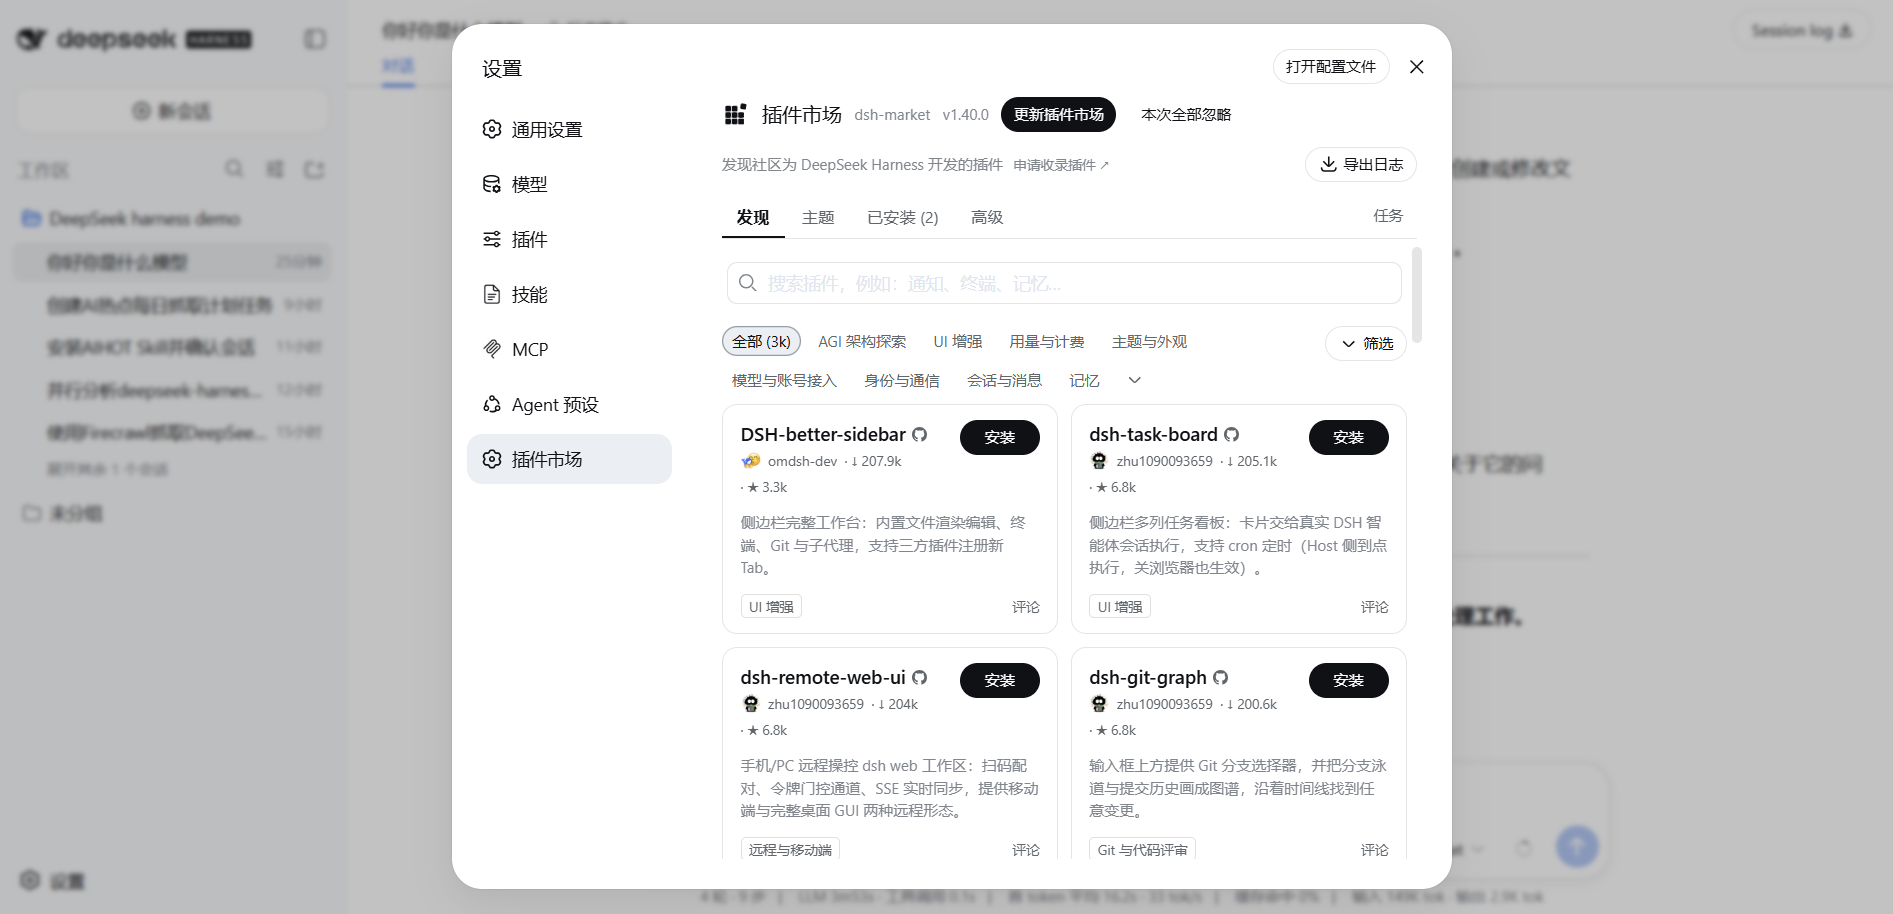
③ Bundle Auto-Mount: Install and Enter the Config Tree
First answer a phenomenon you must have wondered about: why does mcp-client need manual cordis.patch.yml insert for the server config after install, while dshmarket and dsh-skill-mcp-panel take effect with no configuration after install? The answer is in the plugin's own package.json — the difference is whether dsh.bundle is declared. If a plugin wants to "automatically enter the config tree on install", it has to declare this field in its manifest:
{
  "dsh": {
    "bundle": {
      "patch": "./cordis.patch.yml"
    }
  }
}
dsh, after each successful dsh plugin run, will reconcile the bundle list: any package in dependencies that resolves with a dsh.bundle declaration will automatically be added to the bundle layer of that profile (the base layer at the very bottom of the config tree, covered in CH 08), without you having to manually insert it.
As an example, look at the package.json of two plugins with declarations. dshmarket@1.40.0:
"dsh": {
  "bundle": { "patch": "./cordis.patch.yml" },
  "client": { "inject": ["@deepseek-ai/dsh-client-connection", "..."], "platform": "web" }
}dsh-skill-mcp-panel@2.0.1:
"dsh": {
  "client": { "platform": "web", "inject": ["@deepseek-ai/dsh-client-runtime", "..."] },
  "bundle": { "patch": "./cordis.patch.yml" }
}
Both have bundle.patch declarations, so both are automatically entered in the profile manifest's bundle list. Open the web profile's package.json, and the bundle layer looks like this:
"dsh": {
  "profile": {
    "bundles": [
      "@deepseek-ai/dsh-base",
      "@deepseek-ai/dsh-web-app",
      "dsh-skill-mcp-panel",
      "dshmarket"
    ]
  }
}
The first two are official built-in bundles (which go with the global dsh install), the last two are what you installed and were automatically mounted. And what about dsh-mcp-client? It has no dsh.bundle declaration, so it's just a regular dependency — appearing in the profile's package.json dependencies, but not in the bundles list. An analogy: a bundle plugin is like a "self-installing instructions, ready to use" tool; a regular dependency is like "just the tool, no instructions" — the goods arrive, but dsh won't automatically load its capabilities, you have to configure it yourself.
dsh-mcp-client is the latter: it's the "engine that connects to MCP servers", knows how to connect, but doesn't know which to connect to. You have to personally tell it which server to connect to, the address, how the key is passed — that action is writing an insert in cordis.patch.yml (inserting a server config line into the config tree). The Firecrawl config you wrote in CH 12 was one such insert.
Also notice: these two plugins also have dsh.client declarations (platform: web + inject a list of client plugins). That's why they can add interfaces to the Web UI Settings (Plugin Market, MCP Management) — they're both bundles (enter the config tree) and declare client injection (enter the interface).
A boundary you must remember: after a bundle member (something in the bundles list) changes, you have to restart the profile to take effect — a running profile retains the bundle set it had at startup, newly installed bundles only get loaded on the next startup. Note that "restart" here is only to let it auto-load, not to make you configure anything — once the bundle plugin is loaded it's ready to use, you don't need to touch the config. Regular cordis.patch.yml edits go through hot-reload, no restart needed, but add/remove/update a bundle and a restart is unavoidable. The reason you restarted dsh after installing dshmarket in CH 12 was to let it auto-load.
Management Command Cheatsheet
| Command | Effect |
|---|---|
dsh plugin --profile web list | List what this profile has installed (equivalent to pnpm list) |
dsh plugin --profile web add <source> | Install, source see the four kinds above |
dsh plugin --profile web remove <package> | Remove |
dsh plugin --profile web update <package> | Update to latest (ones with bundle declarations will reconcile with the new) |
dsh plugin --profile web why <package> | See why this package was installed (who depends on it) |
How to verify the install after it's done? Two ways:
- See dependencies and bundle attribution:
dsh plugin --profile web listshows dependencies; to see if it's in the bundle layer, look directly at the profile'spackage.json(thedsh.profile.bundlesabove). - See if it's actually mounted in the config tree:
dsh --profile web --dump-configprints the full config tree, search for the plugin name; to see only the bundle base layer, usedsh --profile web --dump-default-config.
Install Three Community Plugins You'll Actually Use
The plugins installed earlier were for explaining the mechanism, and they were also things that were actually needed in the process — dsh is just like this, install whatever you want, everything is a plugin. Now let's install three "instantly improves the experience" community plugins, exactly from GitHub source and npm sources. No need to type commands yourself, just hand it to dsh.
dsh-theme: skin the Web UI
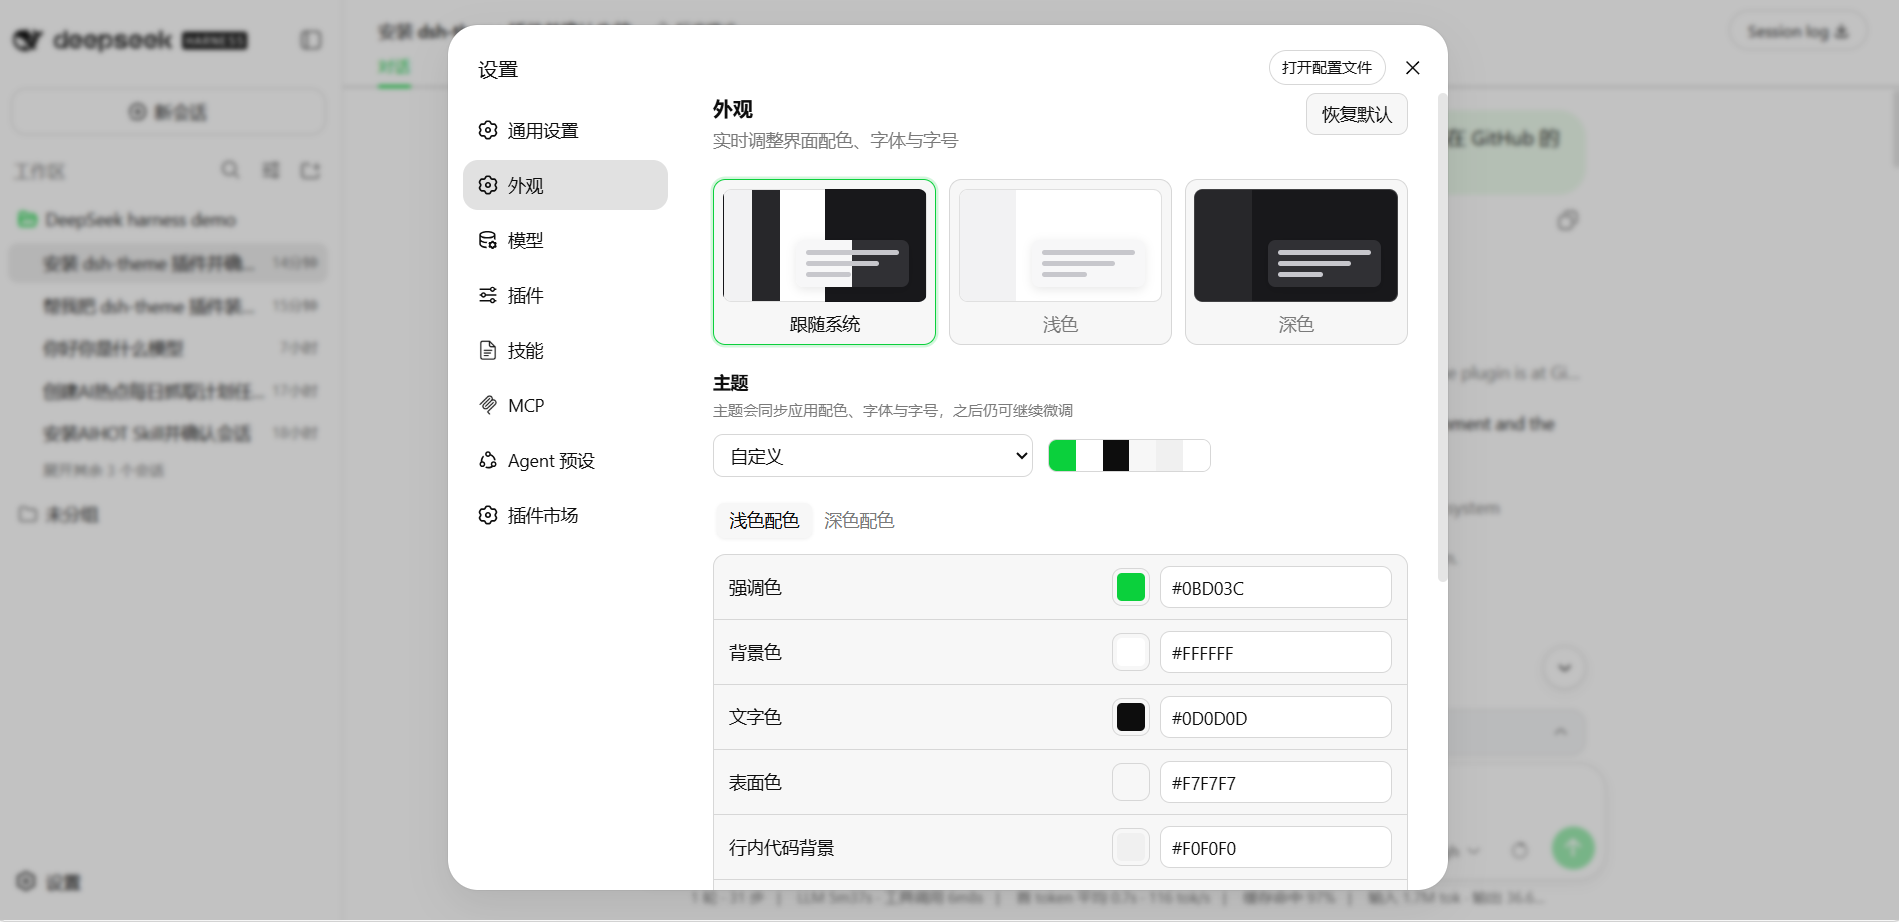
A standalone theme plugin; after install, Settings has a new "Appearance":
- Three appearance modes: light / dark / follow system
- 15 curated themes, including 5 reading-oriented themes + 1 code-oriented Carbon Code theme
- Each theme packs color levels, UI font, code font, font size into a unified config, switchable with one click
- Adjust accent color, background, foreground, surface, sidebar color in real time individually
- Settings are stored in the browser locally, won't lose on refresh (not synced across browsers or profiles)
To have dsh install it for you, send in the input box:
Help me install the dsh-theme plugin to the web profile and confirm it's working; it's in the oil-oil/dsh-theme repo on GitHub.Open source: oil-oil/dsh-theme. After install restart web profile, Settings → Appearance lets you switch themes, looks like this:
dsh-oil-sticky-prompt: pin the latest user message to the top while scrolling
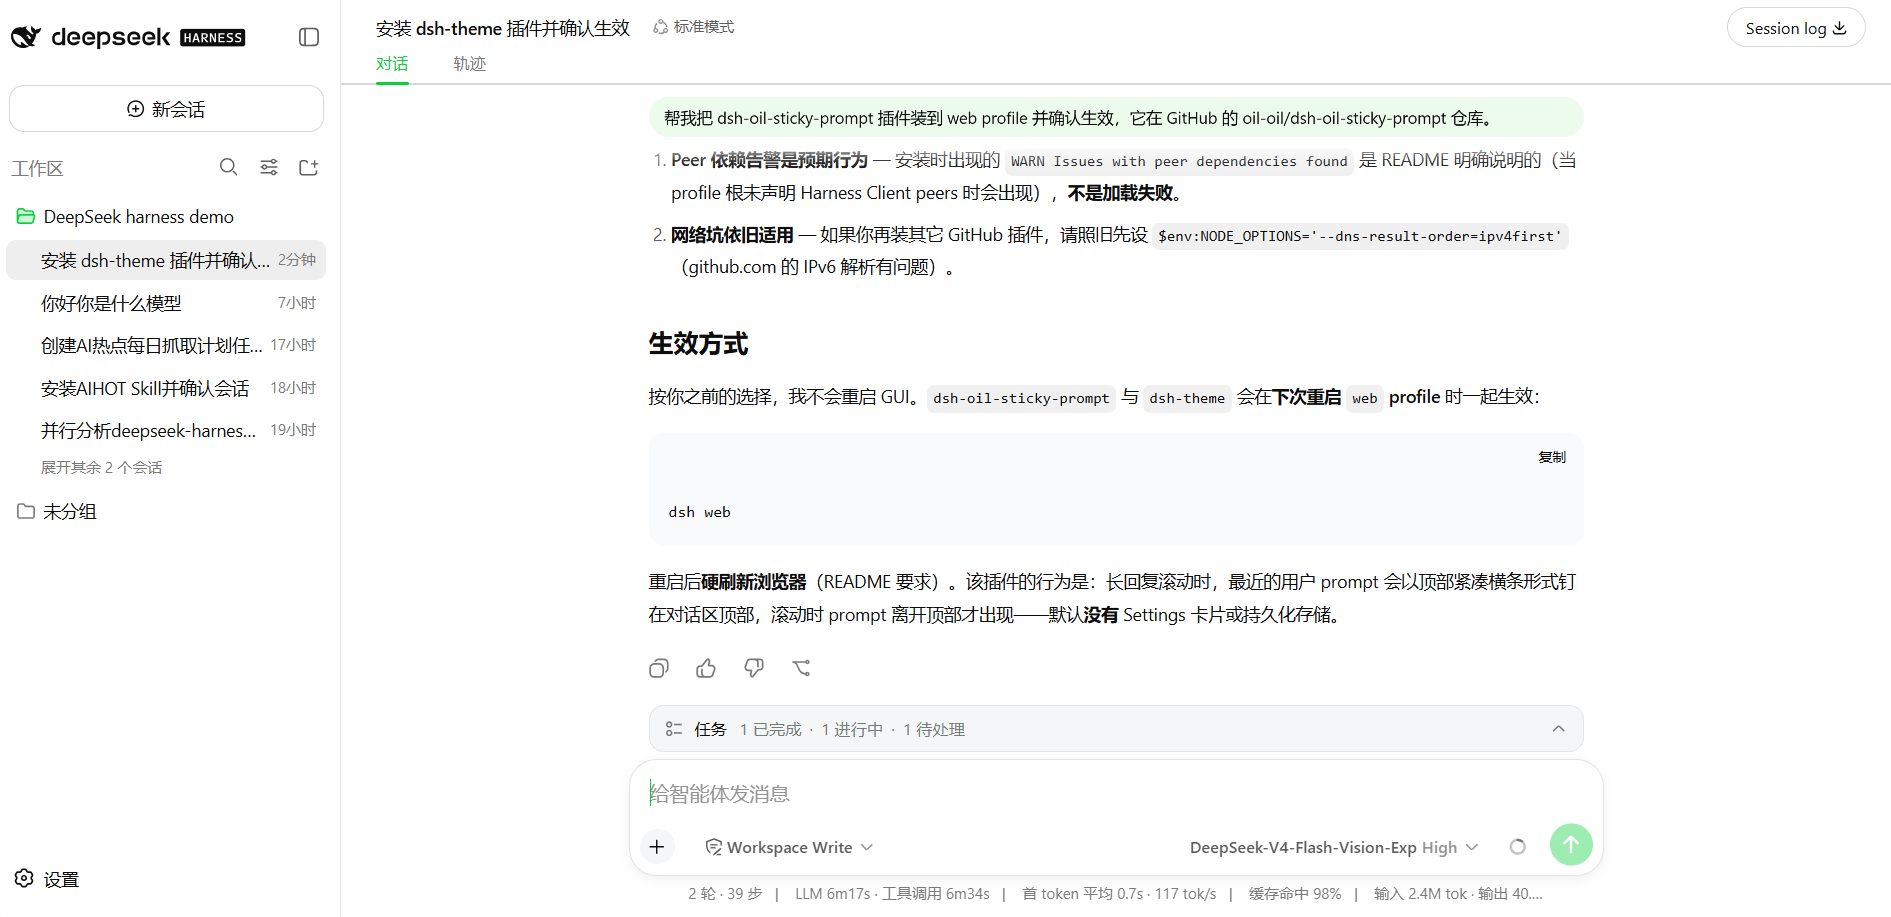
When scrolling through a long reply, the latest user message becomes a compact full-width bar pinned to the top of the conversation, click to jump back to the original:
- Single sticky bar, multiple topics don't conflict
- Original newlines flattened to spaces, max two lines
- Doesn't modify the message, doesn't touch the session log, doesn't persist settings
To have dsh install it for you, send in the input box:
Help me install the dsh-oil-sticky-prompt plugin to the web profile and confirm it's working; it's in the oil-oil/dsh-oil-sticky-prompt repo on GitHub.Open source: oil-oil/dsh-oil-sticky-prompt. After install restart dsh. The picture below is a conversation of dsh actually installing it for me — it explained that the Peer dependency warning is expected behavior, and noted it will take effect when the web profile is restarted next:
dsh-better-sidebar: turn the sidebar into a complete workbench
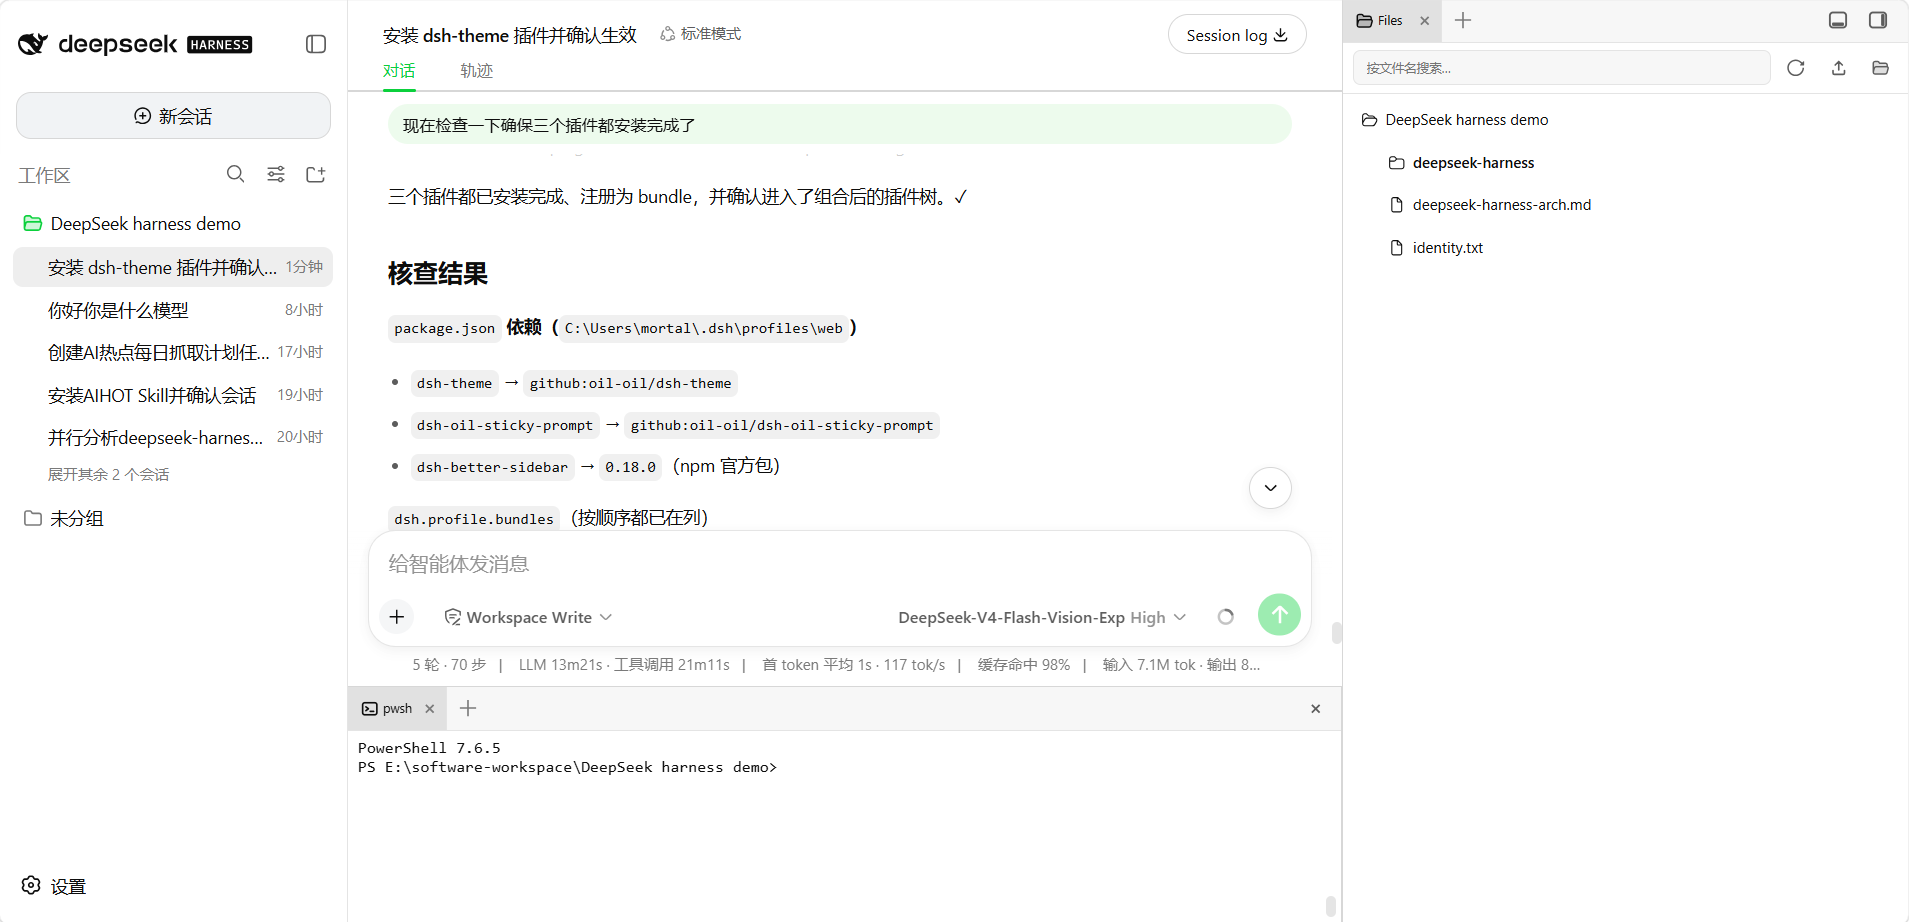
The most feature-heavy one, upgrading the right sidebar into a "workbench". Its layout philosophy is the same line as the sidebars of AI programming tools like Codex — moving files, terminals, Git to be next to the Agent, watch while working:
- File workbench: directory tree + code editor, inline preview for images / Markdown / HTML / PDF / Office
- Embedded browser: multiple webpage tabs, content runs in a sandboxed iframe
- Real terminal: xterm + node-pty runs a real shell, reconnect on disconnect, optional inject terminal tools to the model
- Git panel: real diff, history, right-click stage / commit / revert
- Background jobs page: see subagent topology and background jobs (exit code / live output / force terminate)
- Right sidebar + bottom panel dual workbench, layout remembered by session
To have dsh install it for you, send in the input box:
Help me install the dsh-better-sidebar plugin to the web profile and confirm it's working; it's in the omdsh-dev/DSH-better-sidebar repo on GitHub (npm package name dsh-better-sidebar).Open source: omdsh-dev/DSH-better-sidebar. After install restart dsh, then hard-refresh the browser to see the sidebar (it's a bundle member, only loads on restart), the right-side file browser + bottom terminal appear together:
All three of these have
bundledeclarations, they auto-mount on install (the mechanism in ③). The first time you install those two from GitHub source, if blocked by pnpm's allowBuilds, handle it per the entry in "Common pitfalls".
Common Pitfalls
| Problem | What's happening | How to handle |
|---|---|---|
| Installed but no UI change? | If you installed a bundle member, a running profile won't auto-reload | Restart dsh and check Settings again |
First add of a Git source plugin reports allowBuilds error? | pnpm ≥10 by default prevents source packages from running prepare build scripts | Per the hint printed in the error, copy the allow key into pnpm-workspace.yaml under the profile directory, then re-run add |
| Installing dsh-better-sidebar reports "Ignored build scripts"? | pnpm 11 intercepted native modules' build scripts like node-pty | Run pnpm approve-builds --all in the profile directory (C:\Users\<your-username>\.dsh\profiles\web), then hard-refresh |
| Two sidebars appear after install? | A line you manually mounted before was double-mounted with the auto bundle | Remove the old - insert: ... better-sidebar ... manual mount line in cordis.patch.yml |
| Installed into the wrong environment? | --profile decides where to install | Confirm the profile name in the command is the one you want (web / headless …) |
| Installed but no effect, no error? | You may have installed a regular dependency (no dsh.bundle declaration) | It's just "package arrived", capabilities need to be inserted yourself in cordis.patch.yml to connect (mcp-client is the typical case) |
What you learned in this chapter
You pass if you can complete the items below:
- [ ] State the four plugin sources (npm / GitHub / local directory / tarball), and that the Plugin Market is not a source but a graphical entry
- [ ] Know that
dsh plugin --profile <name>manages a profile's plugins, installing into itsnode_modules - [ ] Distinguish: dsh body installed globally, plugins per-profile,
$DSH_HOME/cordis.patch.ymlmachine-level and site-wide - [ ] Know the three installation methods: command-line add / market one-click install / dependency with
dsh.bundledeclaration auto-mounts - [ ] State the purpose of the three community plugins (dsh-theme skins / dsh-oil-sticky-prompt sticky prompt bar / dsh-better-sidebar sidebar workbench), and install them yourself
- [ ] Know that bundle member changes require restarting the profile, regular patch edits go through hot-reload
- [ ] Use
list/remove/updateto manage plugins, use--dump-configto verify it's mounted in the config tree