
CH 11 · Tools and Sandbox
Chapter Goal
In the previous chapters you've seen the Agent at work: it reads files on its own, runs commands, searches the web, and pops a dialog asking you about sensitive operations. This chapter takes "tool" and "sandbox" apart — how a tool gets called, what checks it passes through; how the sandbox fences the Agent in, and what happens when it hits the boundary. Once you understand these two mechanisms, you'll know why it "dares" to act on your computer, and what it actually can't touch.
Tools: The Agent's "Hands"
In dsh, the Agent itself can't move anything; all its "actions" are done through tools — reading files, running commands, searching the web, each one is a tool. CH 08 said tools are "the cabinet + the gatekeeper"; let's break that down a bit more.
A tool in the system looks like this:
| Part | What it does |
|---|---|
| schema | The "instructions" facing the model: name, description, parameters (JSON Schema) |
| Execution function | The code that actually does the work |
| Output declaration | The structure that must be returned when done |
| Scheduling metadata | Whether it can run in parallel, timeout, how it's displayed in the UI |
The key is the first one: in the model's eyes there's only a tool's name, description, and parameters — the execution function, output declaration, timeout, parallel flag, none of them are visible to the model. This is the first layer of safety: the model knows "this tool exists, the parameters are filled this way", but it doesn't know how it's implemented internally, and it can't bypass the execution logic.
One Tool Call: An Extensible Pipeline
After the model says to call a tool, it doesn't execute directly; instead, it goes through an extensible pipeline. The official team made this pipeline such that every stage can be intercepted or enhanced by plugins — another "everything is a plugin" (an optional finalizeContent stage is omitted from the diagram; it's a tool's own end-of-pipe callback, doesn't affect the main line):
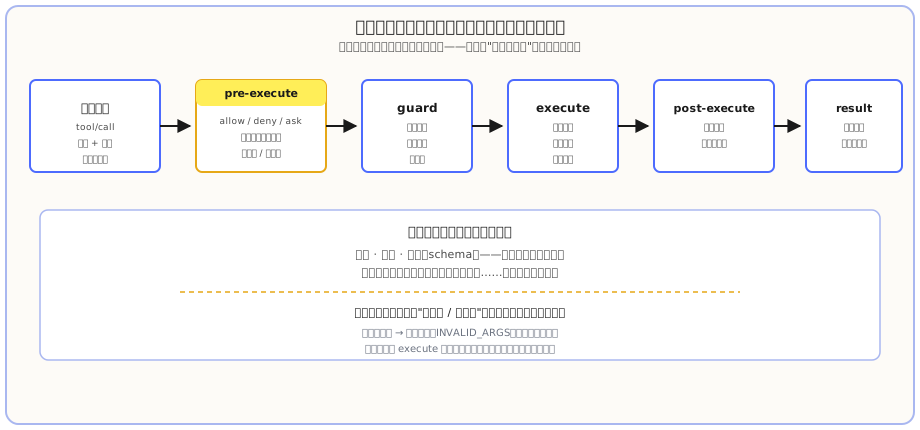
Walk through in order:
- Model request: the model issues a tool/call (tool name + parameters). The parameters are validated first; if invalid, an error is thrown directly (
INVALID_ARGS), and it never executes. - pre-execute: the first check point. Here it decides if a call is allow / deny / ask — the approval dialog you see in the UI happens at this layer.
- guard: a monotonic guard, can only get stricter, not looser, preventing some stage from quietly relaxing the boundary.
- execute: actually executes. The sandbox is mounted on this step — before the command actually runs, it's wrapped in a file shell (see below).
- post-execute: inspects the result, can replace it if needed.
- result: produces the authoritative result, fed back to the model, enters the next round.
Every step can have hooks hung on it by plugins — that's why later, when writing plugins, you can make a plugin that "intercepts certain tool calls" (CH 21 covers hooks). Read this pipeline and you'll know where the approval, sandbox, and log "safety parts" are mounted.
Sandbox: A "File Shell" Around Commands
CH 04 covered the three permission levels (read-only / workspace-write / danger-full-access), from the perspective of your UI operation. Here we look at the mechanism: the sandbox only governs file-system effects; network and process visibility are not in its jurisdiction.
The official team designed the sandbox as two separate layers — "policy" and "backend":
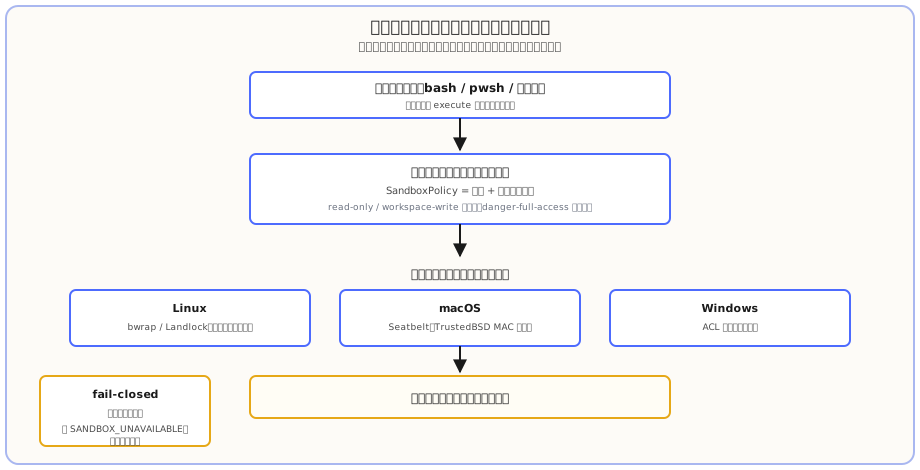
- Policy (SandboxPolicy): re-parsed on every call — mode + workspace root. The workspace root is derived from the current session's cwd.
- Backend (SandboxProvider): wraps the command into a restricted process for the current platform. Each platform has its own implementation — Linux uses bwrap / Landlock (kernel-level unprivileged access control), macOS uses Seatbelt, Windows uses an ACL-restricted token runner.
A few designs worth remembering:
fail-closed: this is the key to its security. If no sandbox backend is available in the current environment, the system directly reports a SANDBOX_UNAVAILABLE error, never silently downgrades to "running naked without a sandbox". Better to refuse execution than risk letting go.
danger-full-access doesn't wrap a shell: only the restricted modes (read-only / workspace-write) go through the sandbox wrapper. Full-permission mode directly spawns the original command with no file isolation — which is also why the UI double-confirms when you switch to the third level.
Mandatory integrity split into full / partial: most of the time the backend can govern all the promised file effects (full); but on older Linux kernel ABIs or some Windows boundaries, it can only govern part of them (partial), and any scenario that requires absolute guarantees must know this. For ordinary daily use, the default workspace-write is stable enough.
Hands-on: See It Yourself
Step 1: See a Tool Call in the Trajectory
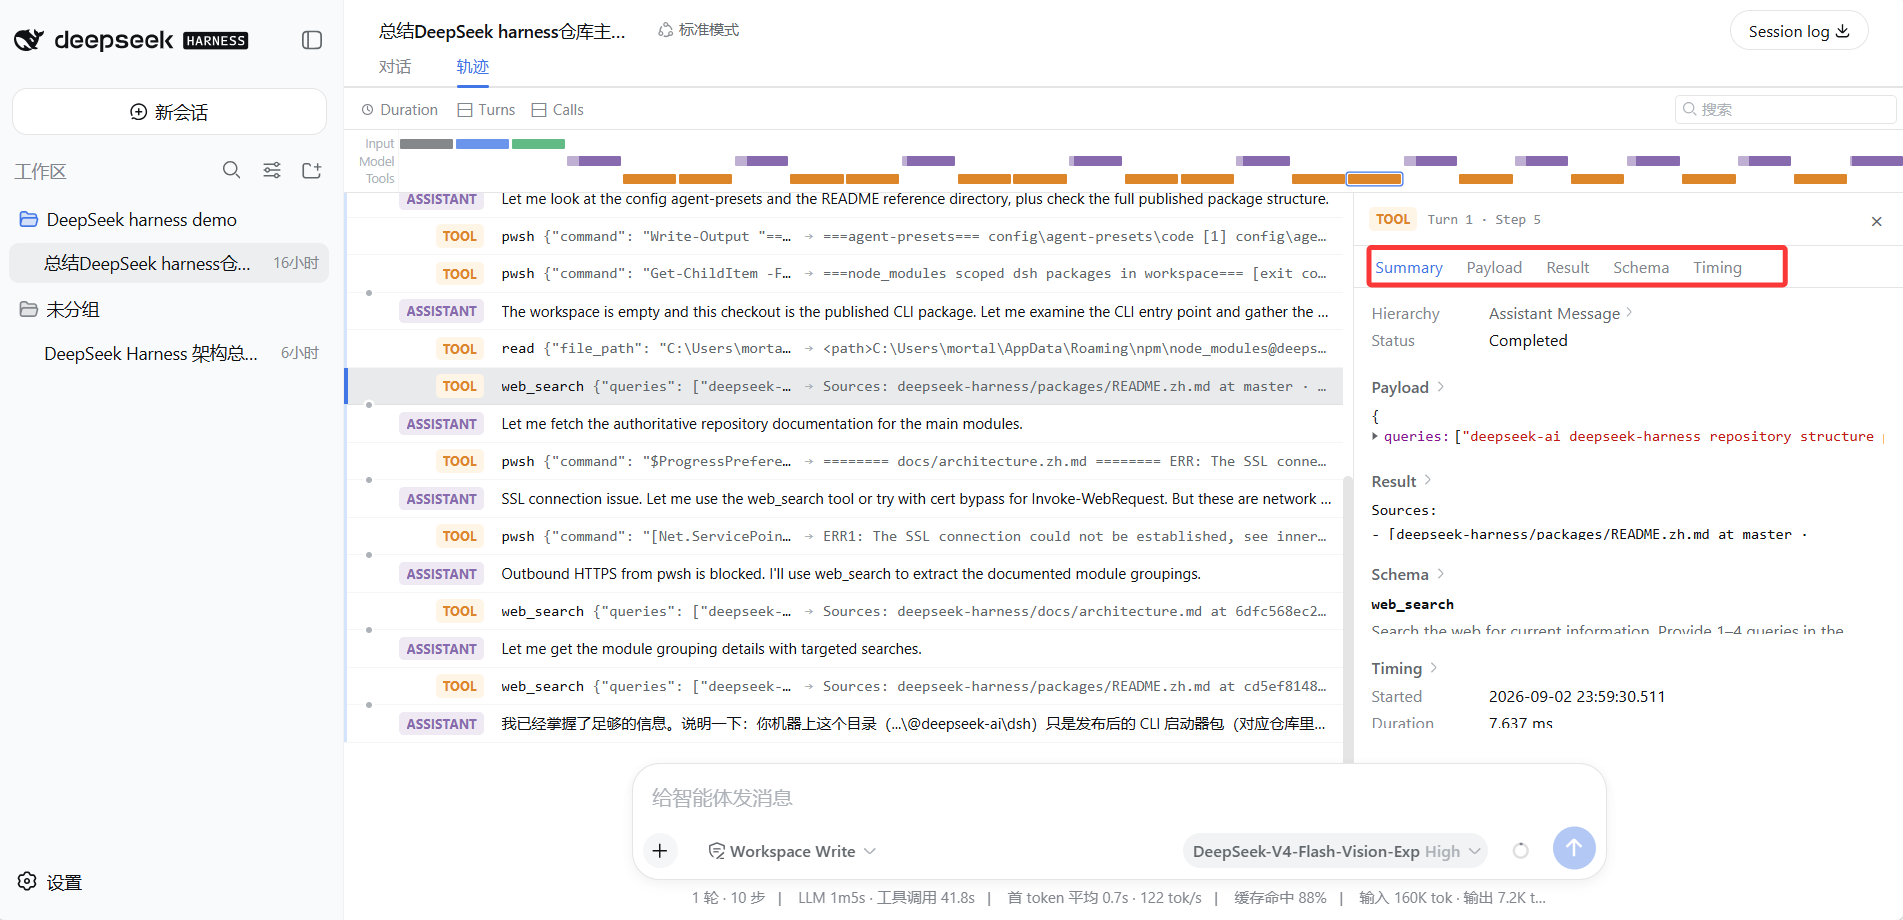
In the Web UI, run a task that does some action (e.g. the kind of repo summary from CH 05). After it finishes, switch to the Trajectory tab, and click any TOOL row. The right-side panel has four key tabs, exactly corresponding to the tool structure above:
- Schema: the tool's "instructions" (name, description, parameters)
- Payload: the actual parameters sent this time
- Result: the returned result
- Summary / Timing: summary and elapsed time
The picture below is a real call: on the left, a TOOL row (web_search) is selected in the timeline; on the right, all tabs are expanded in the panel; at the bottom you can see the round's overall stats — note that in the middle there are also two pwsh commands that failed due to network issues, and the Agent immediately switched to web_search. This is exactly a real example of "tools can change path when they fail":
Step 2: See an Approval
Under the default workspace-write permission, have the Agent write a file outside the workspace. Here, I let it create a greeting file under E:\software-workspace\doubaowork\doubao — that directory is not in the current workspace:
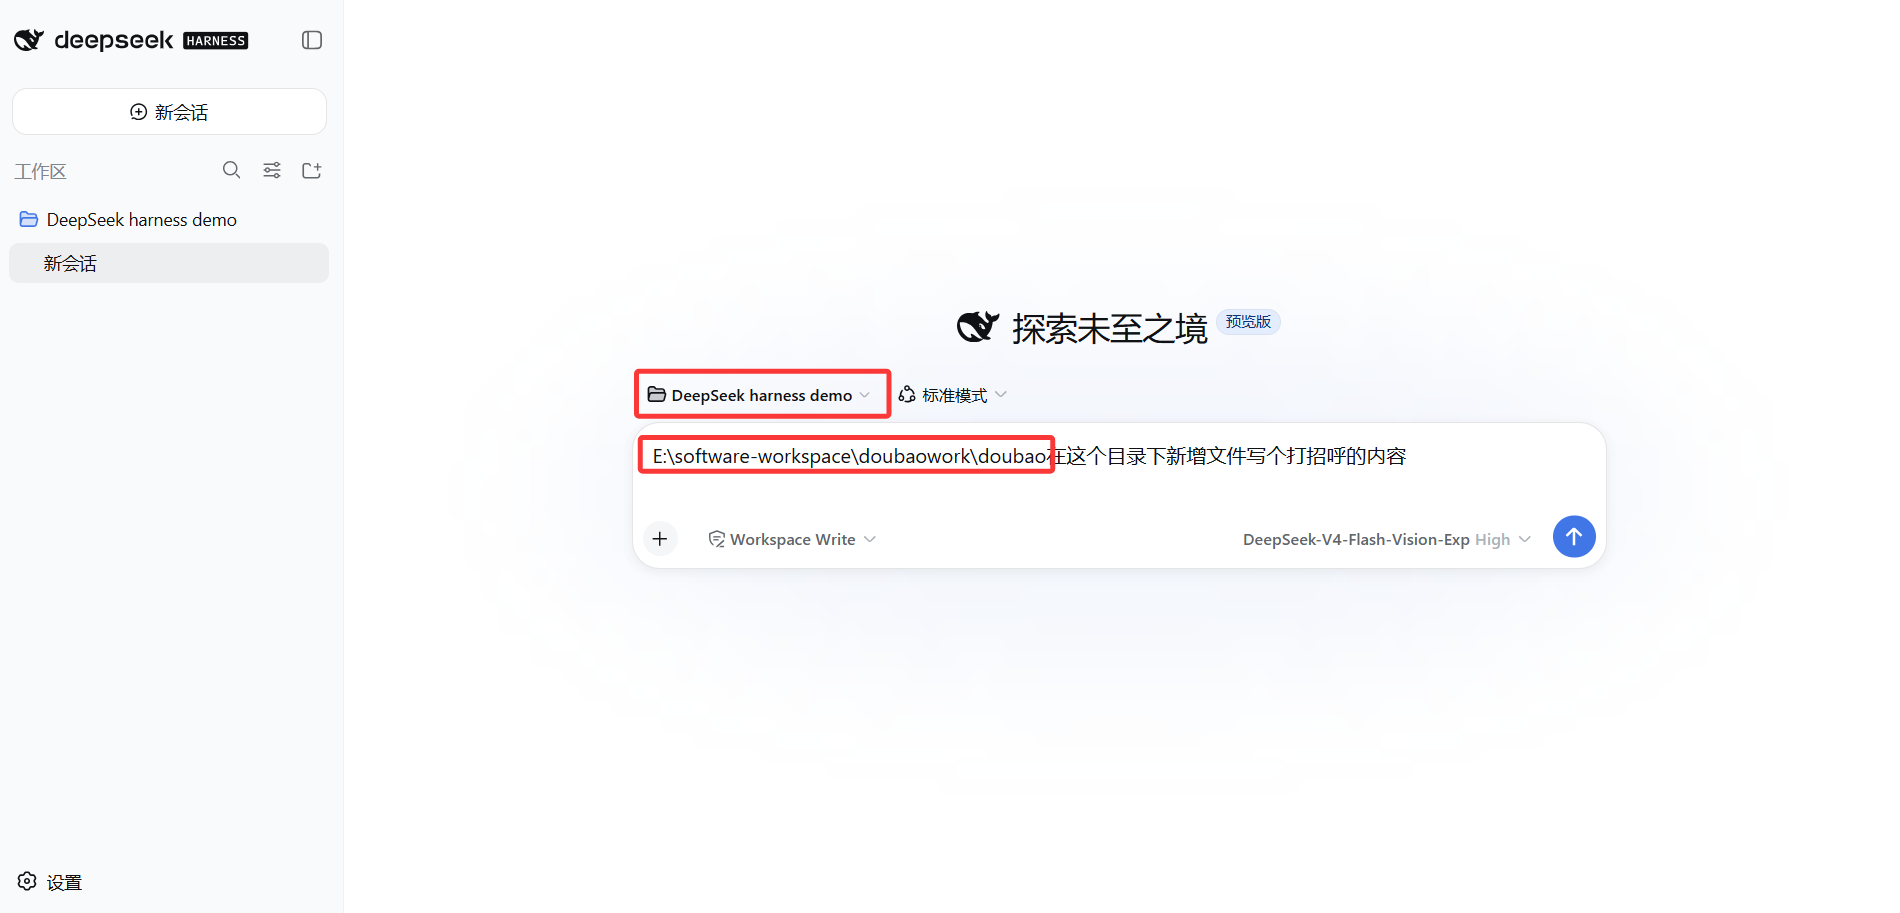
Note that what actually happens is in two steps:
- The first write hits the wall directly — the Trajectory shows
Write · Error: [sandbox: file access denied under workspace-write mode]. - The Agent realizes the target is outside the workspace and proactively requests escalation; the ask dialog at the pre-execute layer pops up only at this point: upgrade the sandbox to danger-full-access, with a reason. The two buttons at the bottom — Deny and Allow once:
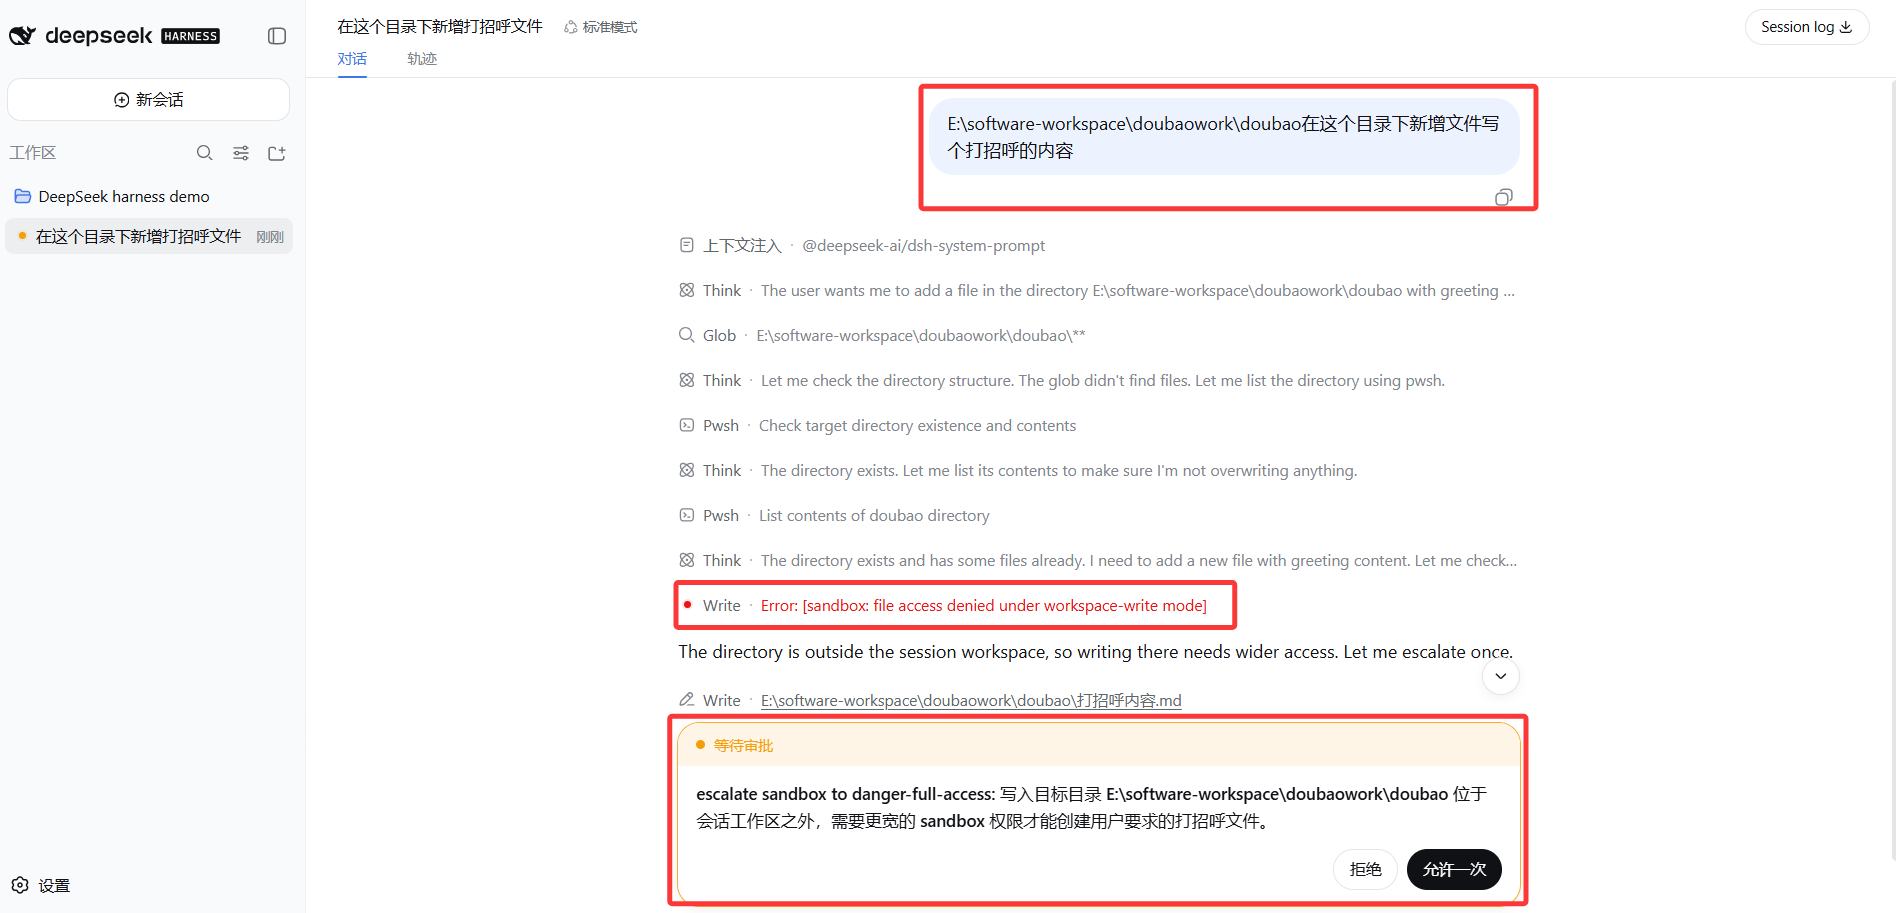
Click "Allow once", it only allows this single write; click "Deny", and it has to find another way.
Step 3: Switch to read-only and See
In the input box type /permission, switch to read-only (after input, the UI will show permission · preset read-only), and have the Agent write a file. The result is similar to above, but with one key difference:
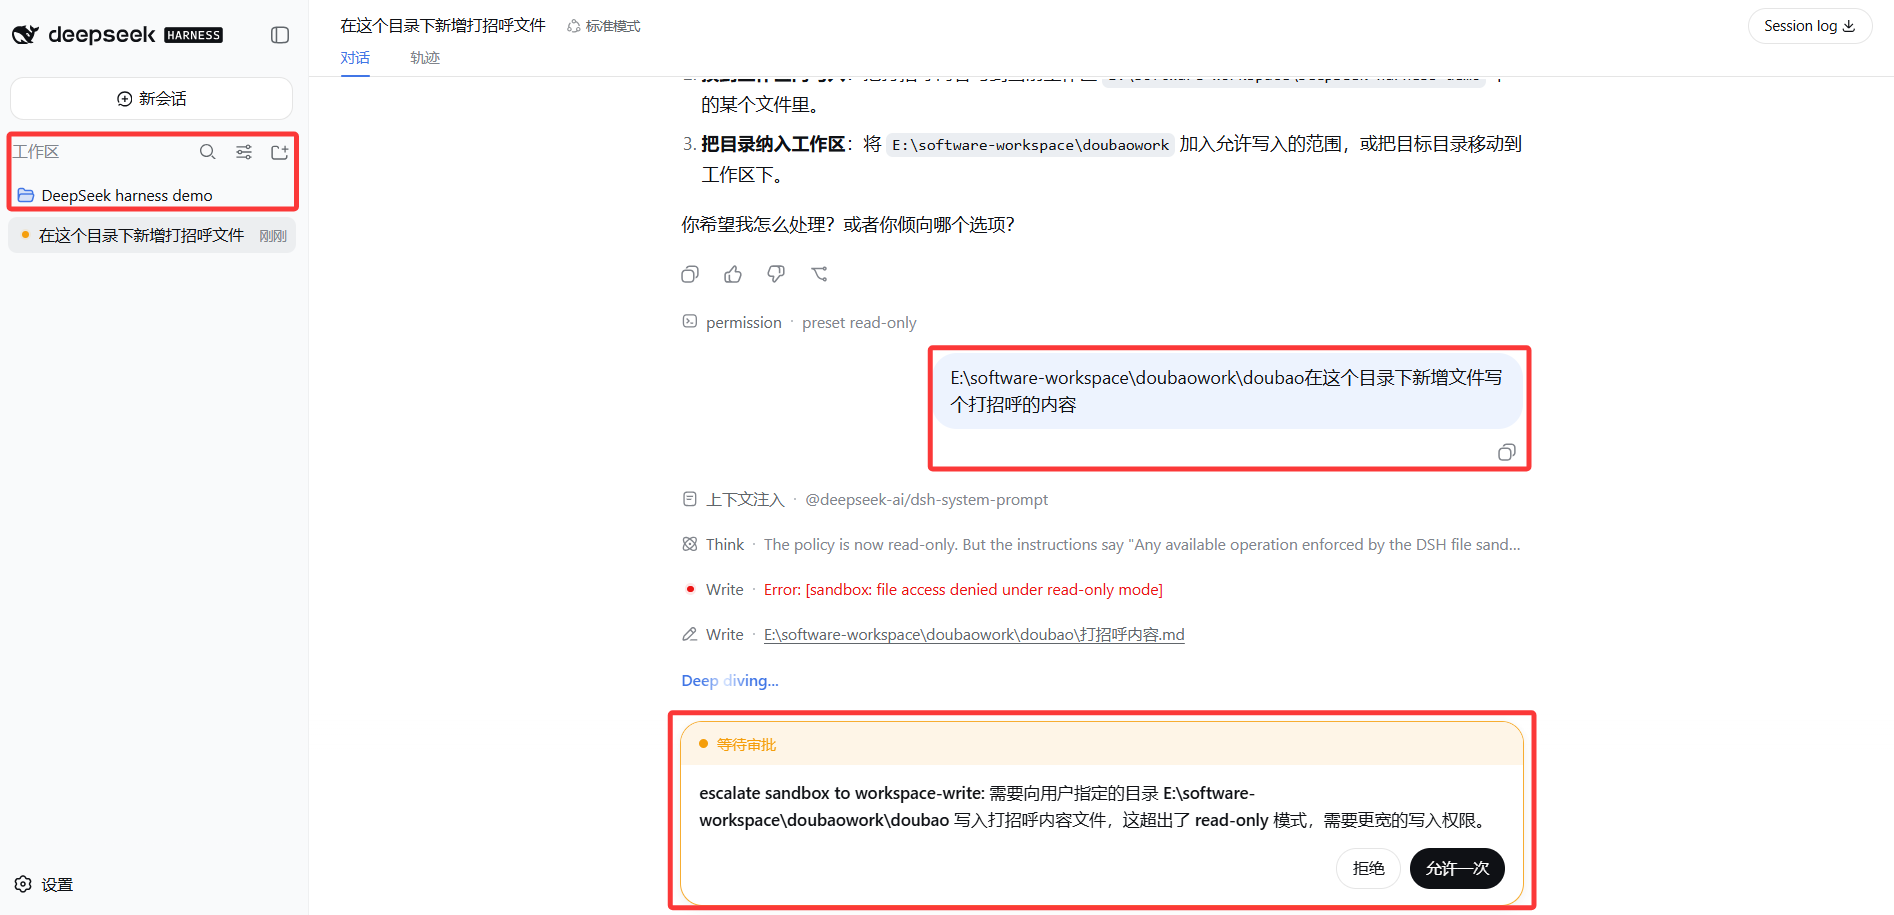
- The first write hits the wall too — but the error is different:
Write · Error: [sandbox: file access denied under read-only mode]. - The Agent also requests escalation — but this time the target is
escalate sandbox to workspace-write, not danger-full-access (it just needs a regular write permission, no need to crank it all the way up).
Comparing the three "blocked" cases makes it clear: regardless of which permission level, when a write fails, the Agent hits the wall first, then pops the dialog asking you. The differences are the error message (workspace-write mode / read-only mode) and the next level it requests (danger-full-access / workspace-write). The "Deny" button is always there — this is the core of the sandbox design: the Agent can "request", but "to give or not" is always up to you.
What you learned in this chapter
You pass if you can complete the items below:
- [ ] State what parts a tool is composed of, and which are visible to the model, which are not
- [ ] Draw the tool execution pipeline (model request → pre-execute → guard → execute → post-execute → result), and state where approval and sandbox are each mounted
- [ ] Explain what it means that the sandbox "only governs file-system effects", and why
- [ ] Explain fail-closed: what the system does when no sandbox backend is available (reports SANDBOX_UNAVAILABLE, doesn't run naked)
- [ ] Click open a tool call in the Trajectory, and understand Schema / Payload / Result
- [ ] State the errors when writes are denied at different permission levels (workspace-write mode / read-only mode) and the escalation targets the Agent requests (danger-full-access / workspace-write)
- [ ] Be able to explain: when a write fails, the Agent hits the wall first then pops a dialog, but "Deny" is always in your hands