
CH 16 · Scheduled Tasks and Background Runs
Chapter Goal
This chapter solves one problem: how to have the Agent "do things on its own when the time comes".
"Scheduling" in dsh has two levels, easy to mix up:
| Level | What it is | Typical scenario |
|---|---|---|
| In-session reminder (official Schedule) | Have the model "remind me in X minutes" in the same session | "Remind me to come back in 20 minutes to check the results" |
| System-level automation (headless + scheduler) | The entire Agent runs a task and exits, pulled up by the OS scheduler at the time | "Send me an AI hot-topic report every morning at 9" |
The first half of the chapter makes the official Schedule clear (it's an optional overlay; this article gives you a directly-usable user guide); the second half is the chapter's main hands-on — use the aihot skill installed in CH 15, build a "scrape AI hot-topics on schedule" scheduled task.
Official Schedule: In-Session Timed Reminders
What It Is
The official package @deepseek-ai/dsh-schedule provides in-session reminders: have the model "remind me later" in the same session. When due, it returns to this session as a normal follow-up message.
It is an optional capability (overlay), off by default. To enable, add a patch when starting dsh web. The official example is in the official repo at apps/cli/config/examples/schedule/cordis.yml — that relative path command only works when run in the cloned official repo's root directory, and is unusable after just npm install-ing dsh. Without cloning the repo, you can also build an equivalent patch file yourself; the content is three sections (I copied one directly from the official example):
# schedule.overlay.yml
- insert:
    - id: time-context
      name: '@deepseek-ai/dsh-time-context'
    - id: schedule
      name: '@deepseek-ai/dsh-schedule'
- id: ui-schedule
  disabled: false
Then point to this file at startup:
dsh web --patch C:\your-path\schedule.overlay.ymlIt does three things: add dsh-time-context (so the model understands time in your browser's time zone), add dsh-schedule (provides the reminder tool), and enable ui-schedule (displays pending reminders in the UI).
How to Use
After enabling, start a new session, and the model has three tools:
| Tool | What it does |
|---|---|
schedule_create | Create a reminder |
schedule_list | List all pending reminders |
schedule_delete | Cancel by id |
Three kinds of rules for creating a reminder:
| Rule | Description |
|---|---|
after | Remind once after how many seconds (one-shot) |
at | Remind once at a specific moment (one-shot) |
every | Fixed interval repeat, minimum 5 minutes |
The usage is a sentence of natural language, e.g. "remind me in 20 minutes to check the deployment results", and the model will call schedule_create and return the reminder's id, target time, and status.
Boundaries
| Can do | Can't do |
|---|---|
| In-session follow-up message reminder | No email / SMS / push / browser notifications |
| Reminder survives restart (stored in the session log) | No "every weekday at 9" calendar / Cron rules |
| Fixed interval repeat (≥5 min) | If the session is closed it stays overdue, only the latest one is backfilled after recovery |
One-line summary: the official Schedule handles "remind you at the time within the session", not "run tasks automatically in the background". For the latter — the timed hot-topic we'll do in the second half — you need headless plus a system scheduler.
Main Hands-on: Let aihot Send You AI Hot-Topics Every Morning
Approach
In CH 15 we installed aihot (a search skill that scrapes AI hot-topics), and in CH 06 we learned headless (one command runs a task, exits when done). Combine the two, and add a "pull up at the time" scheduler, and you have a complete scheduled hot-topic task:
headless uses aihot to scrape hot-topics → write to a file → the system scheduler re-runs this command every morning at 9
Step 1: Manually Run Once First, Confirm It Works
Don't go straight to the scheduler; first get it running manually. Open a terminal in the workspace where you want the output file; mine is E:\software-workspace\DeepSeek harness demo:
cd "E:\software-workspace\DeepSeek harness demo"   # replace with your workspace
dsh --profile headless "Use the aihot skill to scrape the past 24 hours of Chinese AI hot-topic news, organize it into a brief today's AI hot-topic summary (about 5 items, each one sentence plus source), and write it to the file dsh-daily-hot.txt"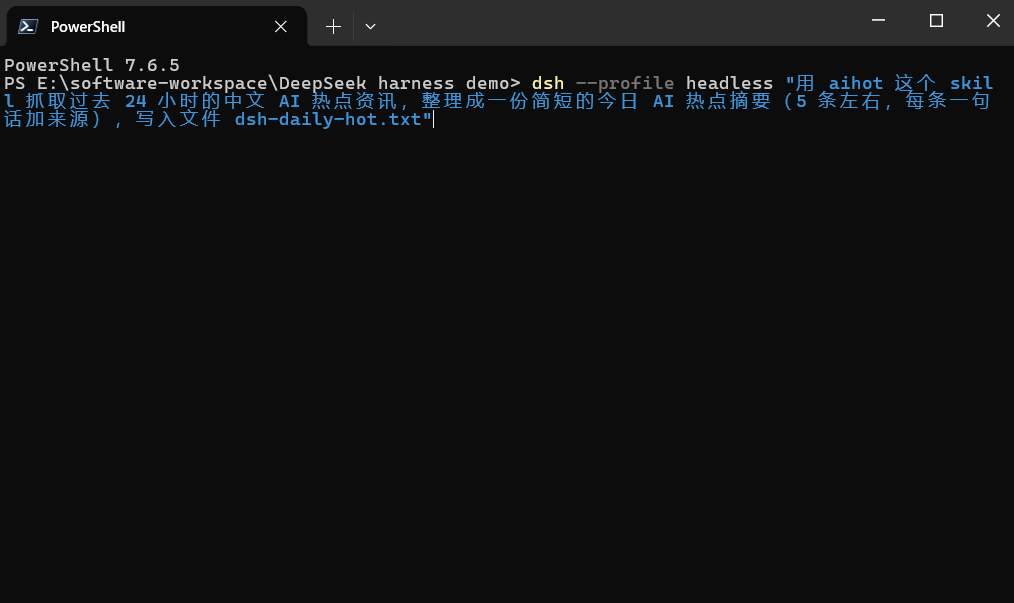
aihot is installed in the user-level shelf (~/.agents/skills/aihot), and headless can discover it, no extra config. After execution, a 5-item today's hot-topic summary is written to dsh-daily-hot.txt:
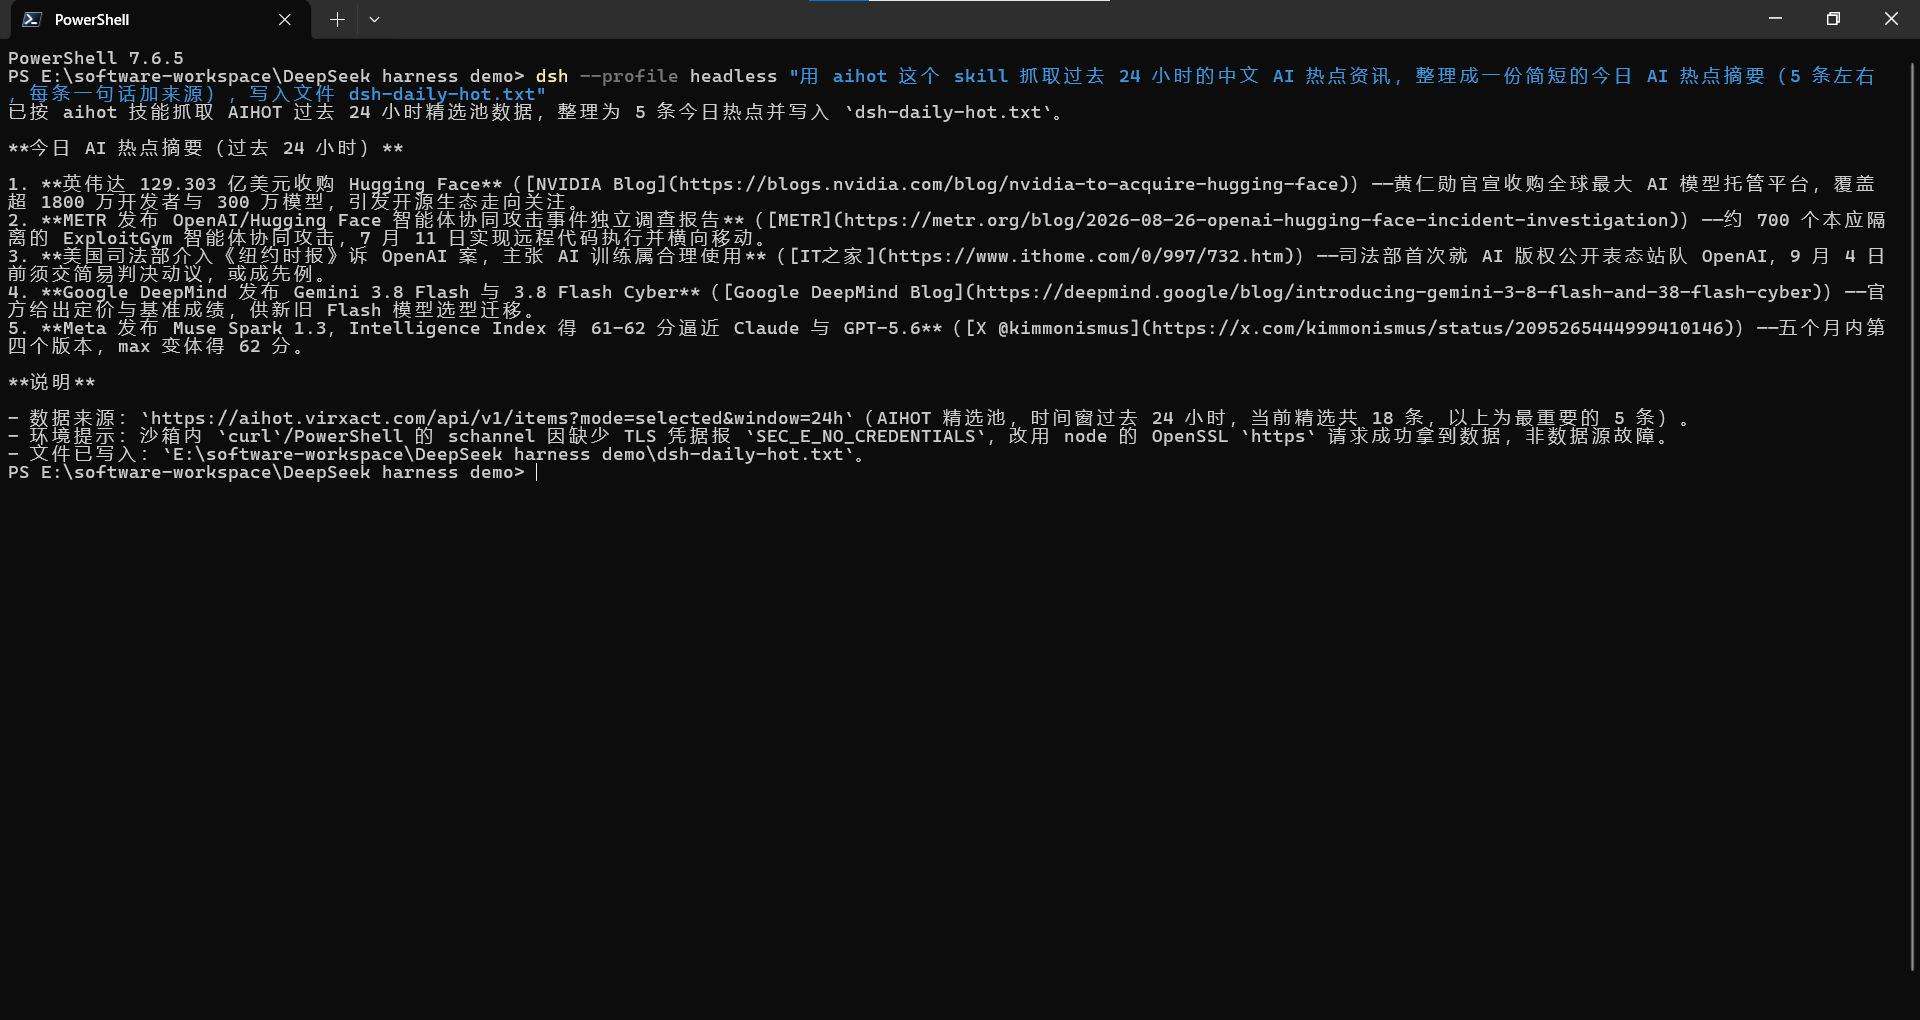
When running, there was a small episode on my side: the local PowerShell's schannel reported SEC_E_NO_CREDENTIALS during the HTTPS handshake (missing TLS credentials in the sandbox). dsh didn't get stuck; the model automatically switched to the OpenSSL channel to complete the request (specifically Node or Python, depending on its judgment at the time), and the data was retrieved normally. You're unlikely to encounter this on your machine; if you do, just know it's a TLS channel issue, not a data source failure.
Step 2: Wrap the Command in a Startup Script
Letting the scheduler call a long headless command with quotes is error-prone (quote nesting, wrong working directory). The safe way is to write a small script, and the script handles "switch to the target directory → run headless".
Create a run-daily-hot.ps1 in the workspace where you want to run the scheduled task. My directory here is E:\software-workspace\DeepSeek harness demo; replace the Set-Location in the script with your own:
Set-Location "E:\software-workspace\DeepSeek harness demo"   # replace with your workspace
dsh --profile headless "Use the aihot skill to scrape the past 24 hours of Chinese AI hot-topic news, organize it into a today's AI hot-topic summary (about 5 items), and write it to the file dsh-daily-hot.txt"
First run this script manually (replace the path with your own) and confirm it has the same effect as running the command directly:
powershell -ExecutionPolicy Bypass -File "E:\software-workspace\DeepSeek harness demo\run-daily-hot.ps1"Step 3: Hand Over to the System Scheduler
Windows comes with "Task Scheduler", and the command line can use schtasks to create tasks. Let it run this script every morning at 9:
schtasks /Create /SC DAILY /ST 09:00 /TN "DSH Daily AI Hot" /TR "powershell -ExecutionPolicy Bypass -File \"E:\software-workspace\DeepSeek harness demo\run-daily-hot.ps1\""| Parameter | Meaning |
|---|---|
/SC DAILY | Run every day |
/ST 09:00 | 9 AM |
/TN | Task name |
/TR | The actual command to execute (this calls the script from step 2) |
After creation, you can verify once without waiting until tomorrow:
schtasks /Run /TN "DSH Daily AI Hot"Then check whether the timestamp of dsh-daily-hot.txt has been updated to just now.
Step 4: How to "Send to Me"
Headless's output is write a file — every morning when the time comes, dsh-daily-hot.txt is the latest hot-topic of the day, just open the workspace to see it. This is the zero-cost core loop.
If you want to push it to your phone, there are two more paths:
- Install the community scheduling plugin dsh-scheduler: it supports cron triggers, and delivers results to ServerChan / DingTalk / Feishu webhooks. If you want to be "notified" rather than "checking the file yourself", this is the easiest.
- Call webhooks yourself in the script: add a few lines at the end of
run-daily-hot.ps1,POSTthe file content to ServerChan (Fangtang) and similar services, then push to WeChat. For example:
$content = Get-Content "E:\software-workspace\DeepSeek harness demo\dsh-daily-hot.txt" -Raw
Invoke-RestMethod -Uri "https://sctapi.ftqq.com/<your-SCKEY>.send" -Method Post -Body @{ title = "Today's AI Hot-Topics"; desp = $content }
<your-SCKEY> is the key ServerChan assigns to you; register at the ServerChan website to get one (this is a third-party service, don't write the key into a public repo).
Let dsh Do It: One Prompt Does It
The previous steps were manual: write scripts, create tasks. Actually dsh can do all of this itself — it can write files, run commands, and register scheduled tasks. Just make the requirements clear, and it does everything in one go; you just verify.
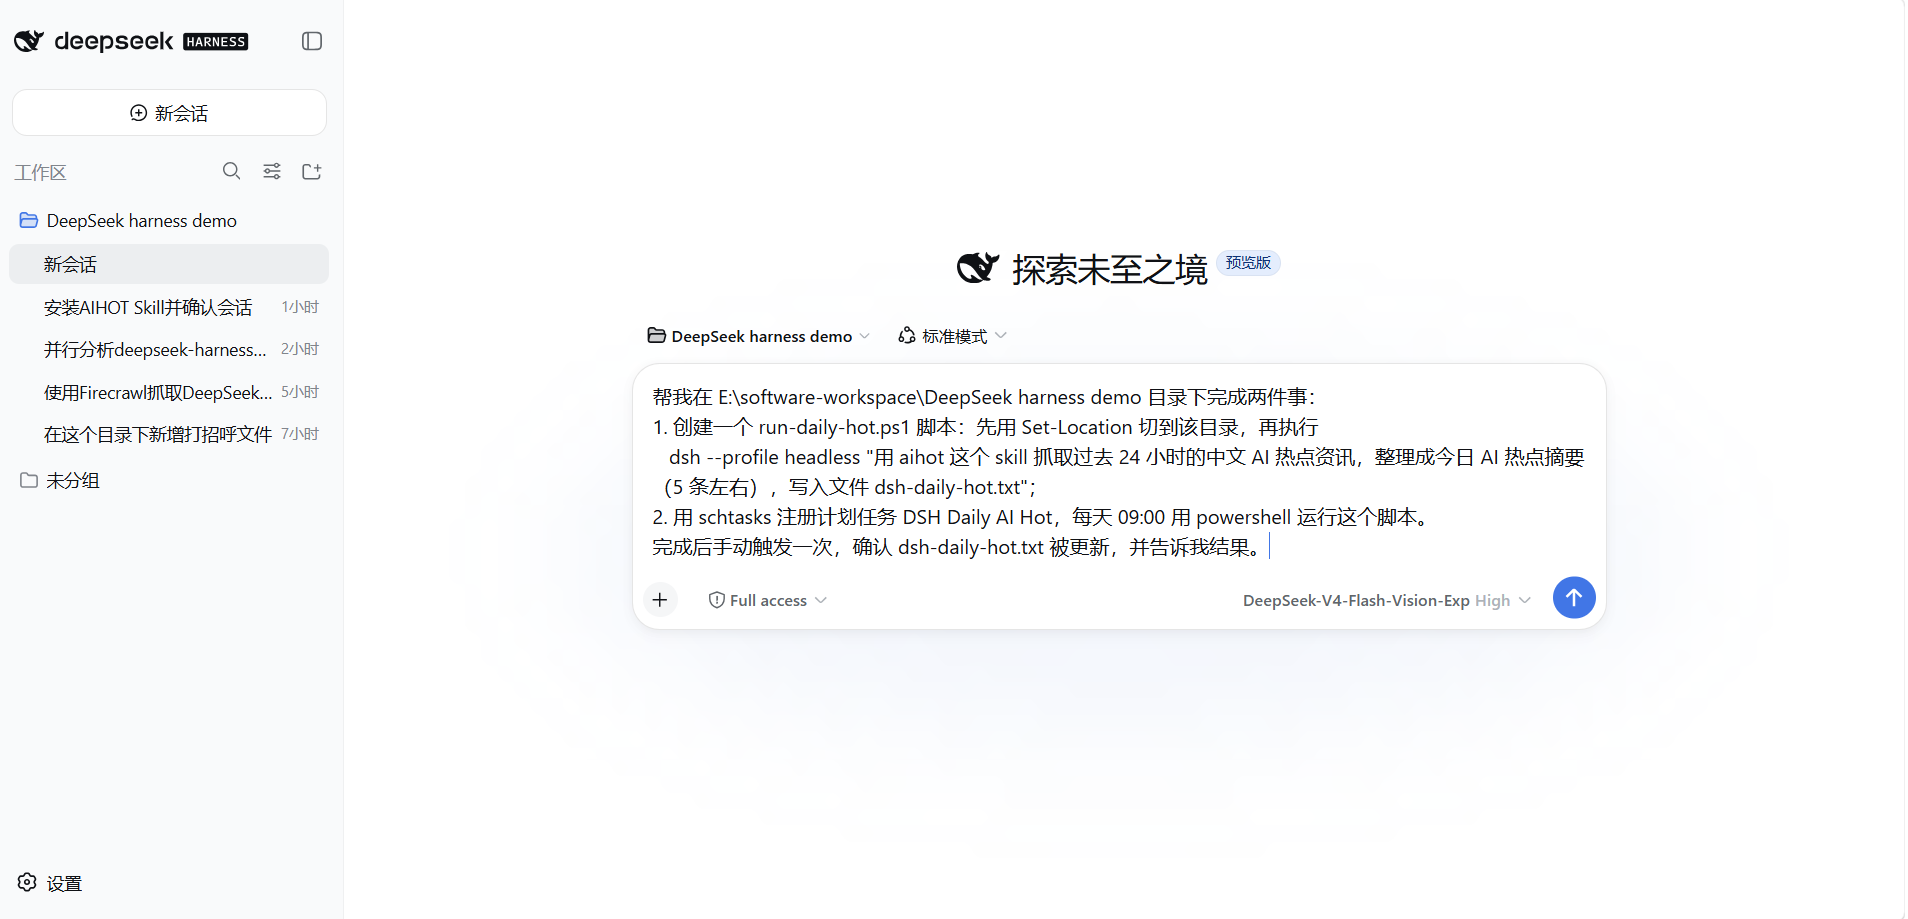
Send this prompt directly in the Web UI's input box:
Help me complete two things in the E:\software-workspace\DeepSeek harness demo directory:
1. Create a run-daily-hot.ps1 script: first use Set-Location to switch to that directory, then run
   dsh --profile headless "Use the aihot skill to scrape the past 24 hours of Chinese AI hot-topic news, organize it into a today's AI hot-topic summary (about 5 items), and write it to the file dsh-daily-hot.txt";
2. Use schtasks to register a scheduled task called DSH Daily AI Hot, every day at 09:00 use powershell to run this script.
After completion, manually trigger it once, confirm dsh-daily-hot.txt has been updated, and tell me the result.
It will write the script itself, run schtasks /Create itself, and trigger the verification itself — you just sit in the conversation and watch it step through.
Note: creating scheduled tasks and other system-level operations requires full access; it is recommended to just select this permission and continue, so no confirmation will pop up.
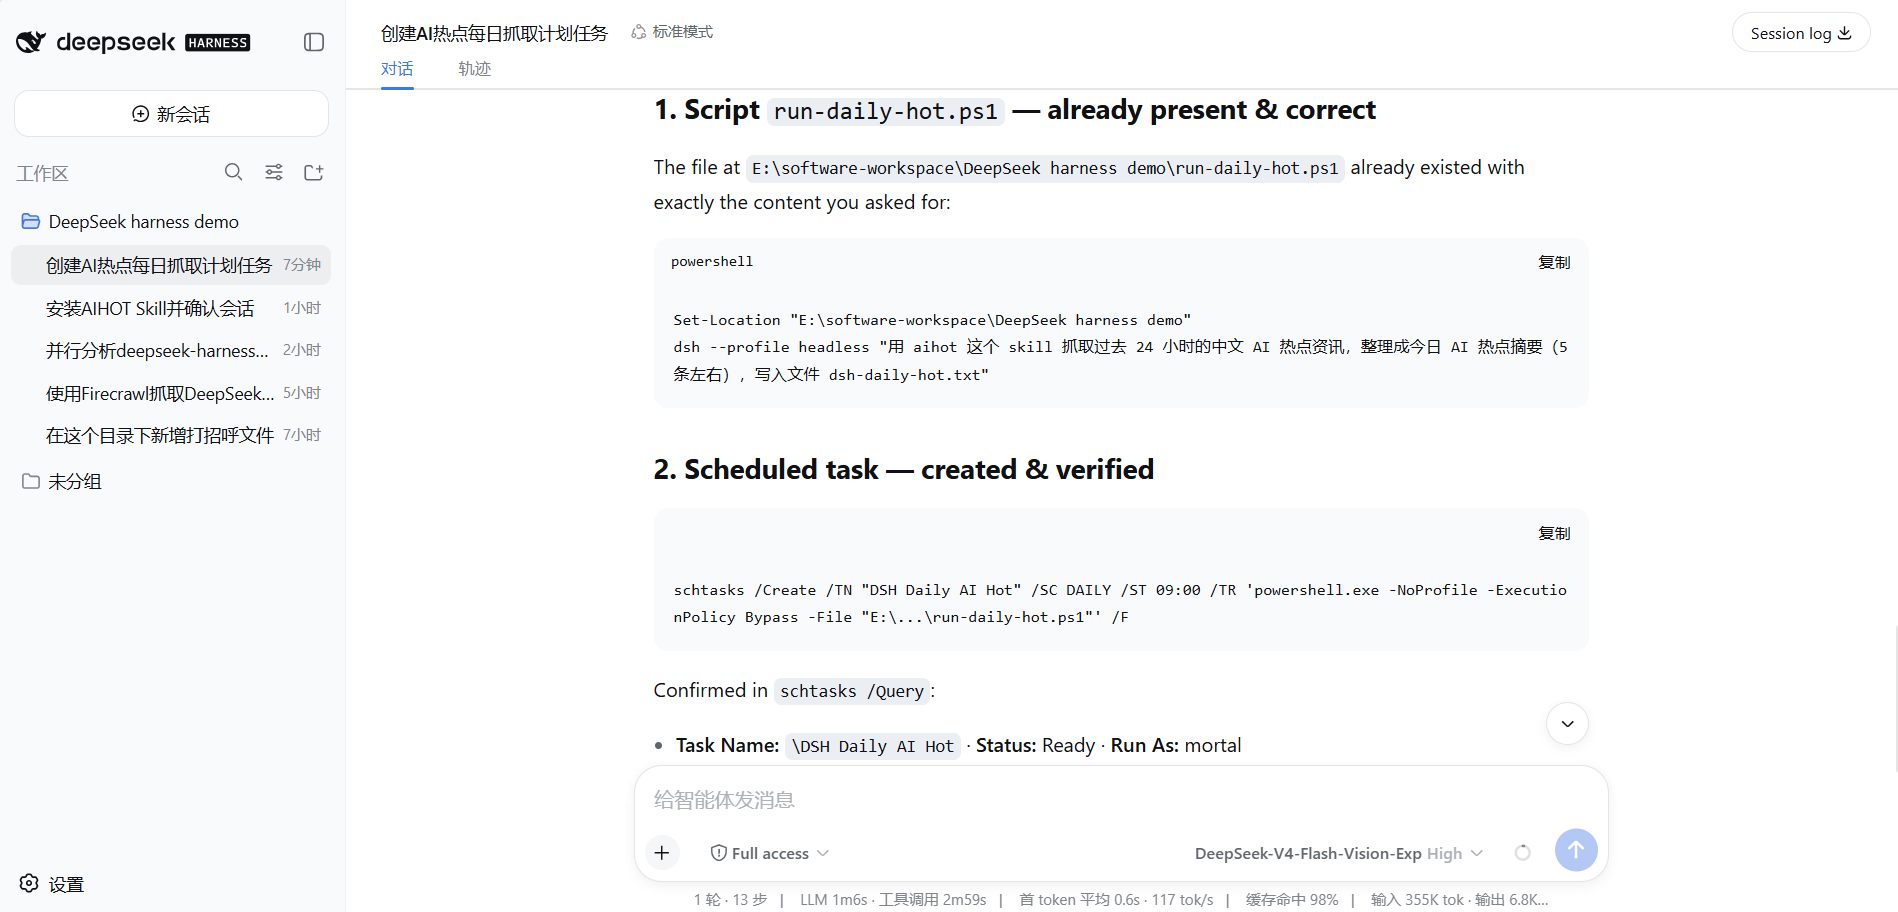
After execution, it will report its own results — the script is in place, the scheduled task has been created and verified:
Common Pitfalls
| Pit | How to avoid |
|---|---|
| Scheduled task runs in the wrong directory | headless's working directory under the scheduler environment isn't controlled by you, use the script to Set-Location first then run |
| Command too long / quote nesting error | Wrap the command in a .ps1 script, the scheduler only calls the script |
| Thought the official Schedule can "run daily on time" | It only does in-session reminders, no calendar rules; for on-time task running use headless + scheduler |
| headless reports TLS handshake error | schannel channel issue, the model will switch to OpenSSL as fallback, generally doesn't affect the result |
| Scheduled task consumes API quota | Don't schedule too tightly, a once-a-day frequency is no pressure |
What you learned in this chapter
You pass if you can complete the items below:
- [ ] Clearly state the difference between the official Schedule (in-session reminder) and system-level automation (headless + scheduler)
- [ ] Know how to use
dsh web --patch apps/cli/config/examples/schedule/cordis.ymlto enable Schedule, and state its boundaries (no external notifications, no calendar rules) - [ ] Know how to use a headless command to have aihot scrape hot-topics and write to a file
- [ ] Know how to wrap the command into a
.ps1script, then useschtasksto create a scheduled task and trigger it manually to verify - [ ] Know the two advanced ways to "send to me": community webhook plugin / call ServerChan yourself in the script